
Western Arthur's Traverse: Walker's Notes, Tips & Tricks
How to complete Australia's toughest offical trail

Four years ago, I typed “Australia’s most spectacular hikes” in Google. An image stopped time for me. Wow. This must be heaven, I thought. It was a trail that belonged to ancient mythology. I had no idea where it was. I just knew I had to go there.
My husband didn’t know it yet, but I was about to spend the next 4 years secretly training him for this moment.
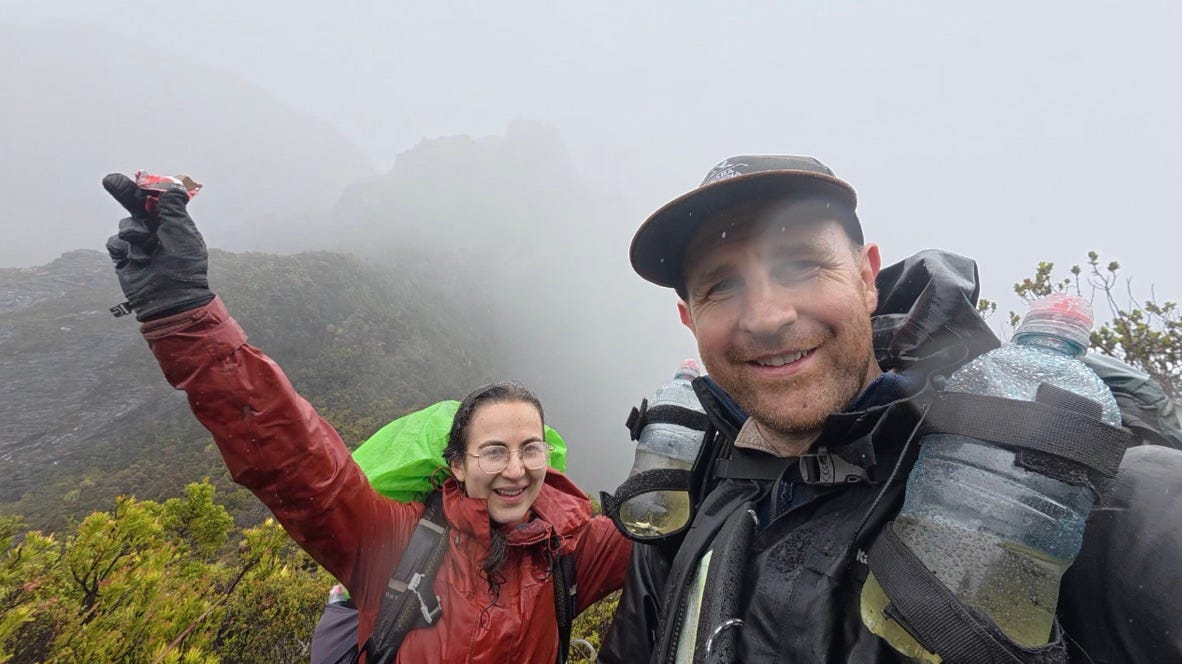
Ladies and gentlemen, in February 2026, we hiked the Western Arthur’s Traverse. Another wild Tasmanian trip.
If you want to get straight into the adventure and see the trail conditions day to day, we filmed the whole thing:
Table of Contents
Overview & Map
Training Guide
Packing Guide
Walker’s Notes — Day by Day
Overview
If this section scares you, we met with an impressive number of people in Tasmania, who came back to do the traverse for the 2nd, 3rd, or the 4th time. It’s magical and daring at the same time.
Length & Elevation
~60.6km and 6,686m total elevation.
Duration
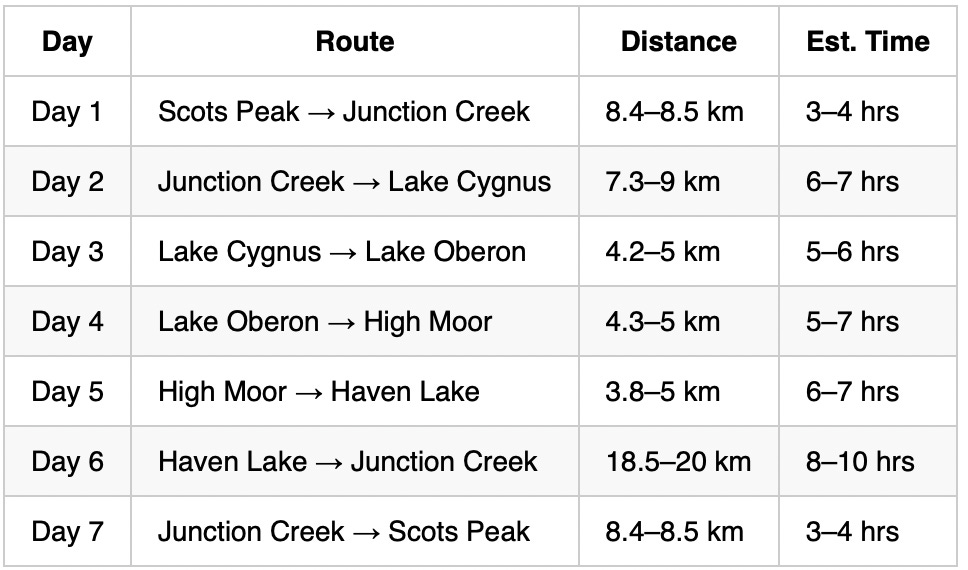
Official recommended duration: 7 days
We completed it in: 5 days of hiking (6 days on trail, including one enforced rest/injury day)
Tip: pack for an additional day in case of bad weather. I know the ultralight folks would rather starve on the trail than carry additional food, but I don’t risk that.
Tip: if this is your first WAT trip, plan to be on the trail for 7 days, rather than assume you’ll bounce on rocks like mountain goats.
Seasonality & Climate
Mid-December to early March are generally ok to attempt this trail. Late January to mid February have historically been the safest days.
Check the weather in advance. You do not want to be doing this trail during heavy rains and heavy winds.
Tasmanian southwest wilderness weather is notoriously fast-changing. We experienced sunshine, storms, pouring rain, high winds, and clear blue skies within a single trip. Some people have seen light snow during summer, so come prepared to get wet and cold.
Nights at elevation (particularly High Moor campsite) are cold enough to freeze food overnight.
Grade
5 (suitable for bushwalkers experienced in rock scrambling only) - this is the toughest official trail in Australia. It is very remote, challenging and risky. Only about 500 people complete the traverse every year and PLB calls are relatively common. ~12 rescues in a month is not unusual.
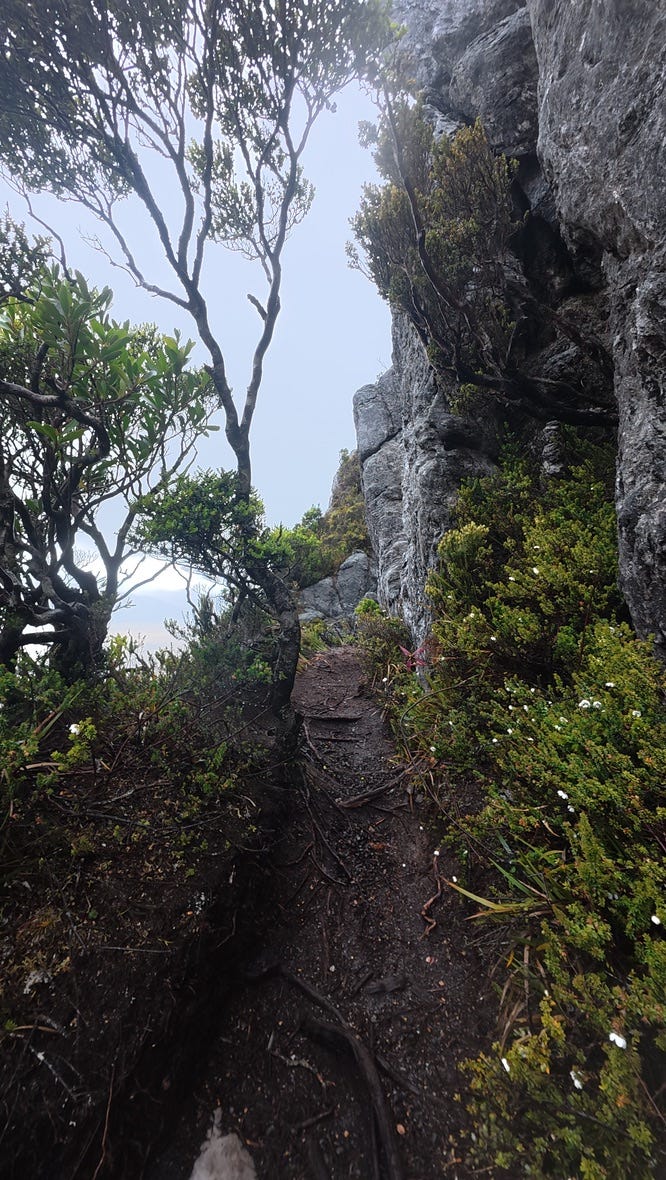
Terrain
Day 1 & 7: bit of mud, creek crossings, bit of boardwalks. Most of the trail is very rocky with a few soft soil and bushbashing bits. It is unfair to call this trail a hike, as there isn’t much hiking on days 3-6. Expect steep climbs and descents, and a few technical rock scrambles.
Skills Required
Multi-day wilderness camping in remote conditions
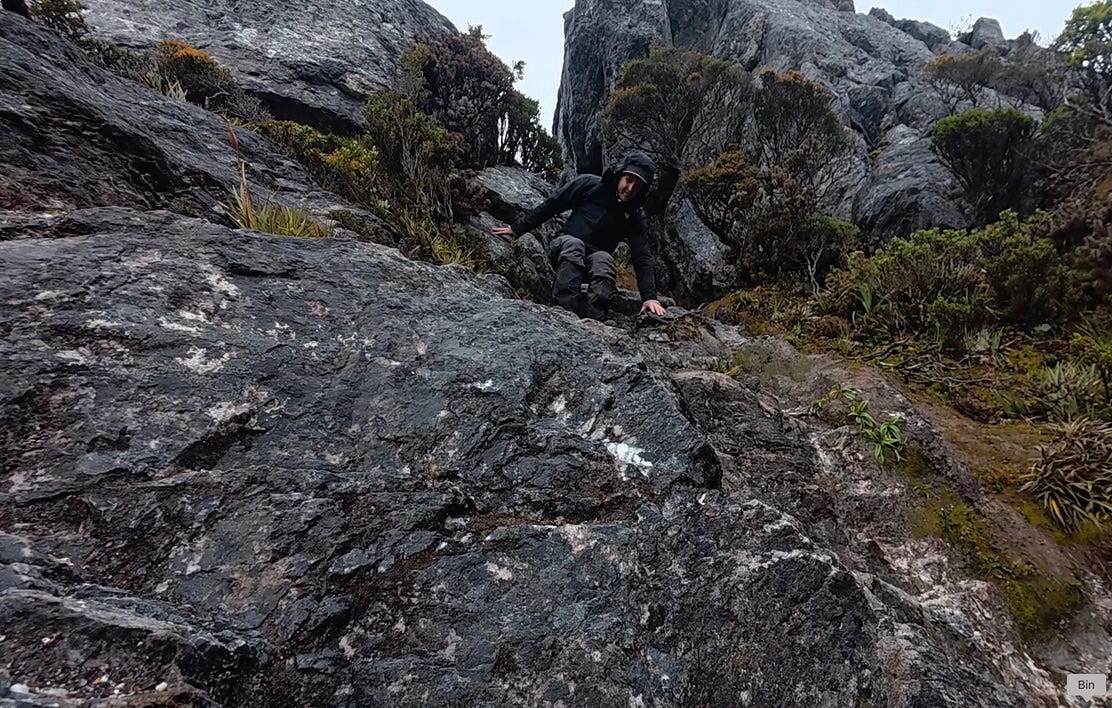
Basic rock scrambling (hands and feet)
Basic rope skills — lowering and hauling packs at technical sections
Navigation: trail markers deteriorate over winter. Wooden sticks and rock cairns are often the only markers in sections.
Animals on the Trail
Other than a few bugs and one leech at the start of the trail, we’ve only seen rats. Come prepared to fight the rats! Joking, just bring peppermint oil and equipment to hang your food between trees. The rats are bold, fearless and persistent to steal your freeze-dried meals and chocolates.
A Note on Solo Hiking
We strongly recommend you do NOT attempt this trail alone. Unless you are a competitive athlete confident on the Tasmanian wilderness, it is irresponsible to do this hike solo. The risks are high and not in your control (i.e. sudden bad weather). Multiple sections involve exposed scrambling and vertical descents where a fall is potentially fatal. Having a partner to lower packs, plan how to tackle the technical sections, and assist in an emergency is necessary. This is not a trail to boost your ego. We’ve met with people capable of completing this trail in 3 days who still choose to bring their mates on the journey.
Community Support
There is a FB group to follow. Check out r/tasmania on Reddit as there are a few WAT posts.
Popularity
Bookings are mandatory, as the campsites are not that big. The trail was booked out months in advance, but a lot of people don’t show up or over-estimate their abilities. It is common for people to trace their steps back from day 2 or 3. So, when we checked the logbooks on the trail, there were a lot of empty dates. Some of the campsites we’ve stayed in were also half-empty. We’ve only met with 2 groups on Days 4 & 5. We’ve seen 2 other couples on the last day in the afternoon.
Accessibility
We drove from Hobart with our Jeep to the Huon Campground — approximately 3 hours. The Tasmanian Wilderness Adventures company has shuttle buses to drop off and pick up people too.
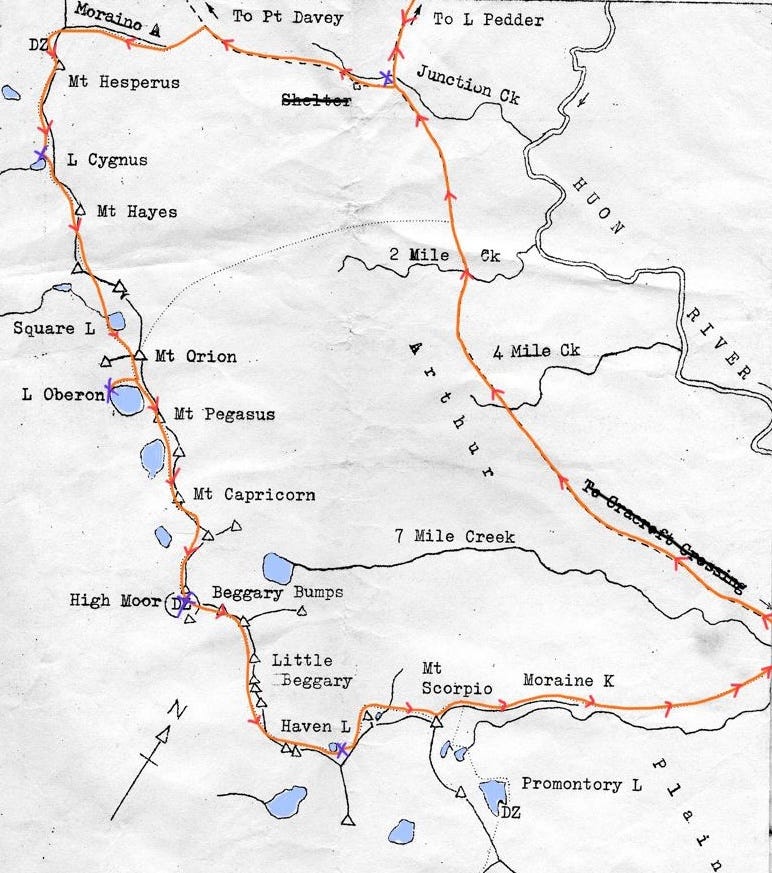
Map
Map from UNSW Outdoors Club
Drop toilets are available at all five campsites (Junction Creek, Lake Cygnus, Lake Oberon, High Moor, Haven Lake).
Most campsites have raised wooden tent platforms to protect the alpine vegetation. The platforms only have a few nails and ropes for anchoring, so a freestanding tent is strongly recommended.
Training Guide
If you are thinking of training for the Western Arthur’s Traverse, I am assuming that you are already a very strong hiker with experience in several moderate and tough multi-day hikes. I am also assuming that you are an active person with some gym (resistance training experience). If not, you’ve got ~3 years of training ahead of you.
A very good checklist for progression to follow: Overlander Trail -> South Coast Track -> Frenchman’s Cape -> Mt Anne Circuit -> WAT.
From this checklist, we have only done the South Coast Track, and supplemented with a 5-day alpine hike in New Zealand (Rees-Dart trail). This was the decision of an overly confident reasonably athletic young couple that we later recognised as pushing too far too soon. I do not recommend people to skip the steps listed above.
Unless you are an outdoor rock climber with lots of alpine hiking experience, take training for this trail very seriously.
Make sure you are cardio fit + you have Grade 1 rock scrambling experience (ideally with a heavy pack during rain) + you do regular resistance training to build both upper body and lower body strength and muscular endurance.
On the trail, almost everyone complained about their weaknesses. Outdoor rock climbers without much heavy lifting experience complained about heavy DOMs on their legs. I never experienced DOMs and recovered well every night, due to years of gym training, but were not happy with our slow speed (due to our lack of good rock scrambling experience).
On top of our extensive hiking experience, we transitioned to a heavy training program for 6 months leading up to the hike.
1x a week walking up and down 2000 steps with weighted packs. We transitioned to 3000 steps 2x a week the last 6 weeks of the program. With gradual overload, my initial pack weight was 5kg and heaviest pack weight was 18kg. David’s heaviest pack was 28kg.
This built excellent muscular endurance. Also, once we transitioned to our WAT weights, we felt very bouncy.
2x a week weightlifting sessions focusing on pull ups, dips, squats, bulgarian split squats, dumbell step ups, hip thrusts + some auxiliary exercises.
Upper body strength and endurance are super important when you’ll be rock scrambling with a heavy pack. Our lower body exercises generally tried to mimic pushing and stepping up motions to assist helping, with additional glute work.
1x a week injury prevention day with stretching + physio exercises to strengthen tendons and joints.
Highly recommend single-leg calf raises, achilles work, balance ball exercises, resisted band knee-up (hip flexor strengthening), and step downs (without actually stepping down) for knee strengthening.
2x a week running for additional cardio.
In retrospect, we were missing rock scrambling experience which would have massively helped. I also think doing some calisthenics work for upper body would have helped me, as WAT puts a lot of stress on the wrists for short people (like me). Imagine performing versions of pull ups and dips with a big bag on your back for half of the day.
We compensated our lack of rock scrambling skills by being very athletic + young (makes one overly confident and energetic) + having a lot of tough hiking experience (including some in Tassie) + luck.
Despite only hiking for 5 days (of this 7-day trail), I still think we were in the bottom 20-25% of all hikers completing this trail. Many only attempt, and trace their steps back.
The general recommendation is that if you found Day 2 of WAT challenging, go back. I’ll add that if you find Day 3 very tough, then Day 4 will be 3x harder. This trail isn’t one that you can ‘YOLO’.
Another way of thinking about training is knowing who the Western Arthur’s Traverse is for.
I would describe the ideal person who would really enjoy this journey as an outdoor rock climber (or a boulderer) who enjoys multi-day hiking. OR, someone who has a sh*t ton of hiking and basic rock scrambling experience, who has also completed the South Coast Track / Frenchman’s Cape AND Mt Anne Circuit.
This journey could also be completed by…
A very strong hiker with lots of running experience, who also have experience with callisthenics OR can do a bunch of weighted pull ups and dips.
Downside: nothing compares to real climbing experience. They will be very slow on days 4 & 5, stopping to pack haul a few times, and must leave campsite very early.
Young - tall - very fit and active - men - with courage higher than capability. You know how some young men have the daring attitude that they can do anything in this world, move before they think? They slip and slide, laugh it off and bounce back up — that’s what I mean.
Downside: the same profile of people could also make immature decisions, like attempting the toughest days when its showering and storming outside.
If you don’t identify with any of the above profiles, do not attempt this journey.
Note: being tall can really help on the Western Arthurs. There were a lot of sections where David stepped down and exhausted moderate effort.. while I, the shorty, slowly lowered myself (negative pull ups), dangled my feet in air, jumped down and exhausted high effort. Not reaching to secure handholds and foot holes with a heavy pack feels really dodgy. The trail gets eroded over time as well. The amount of strange versions of dips I’ve done on this journey is unreal. Hence, I got a minor wrist injury from overuse.
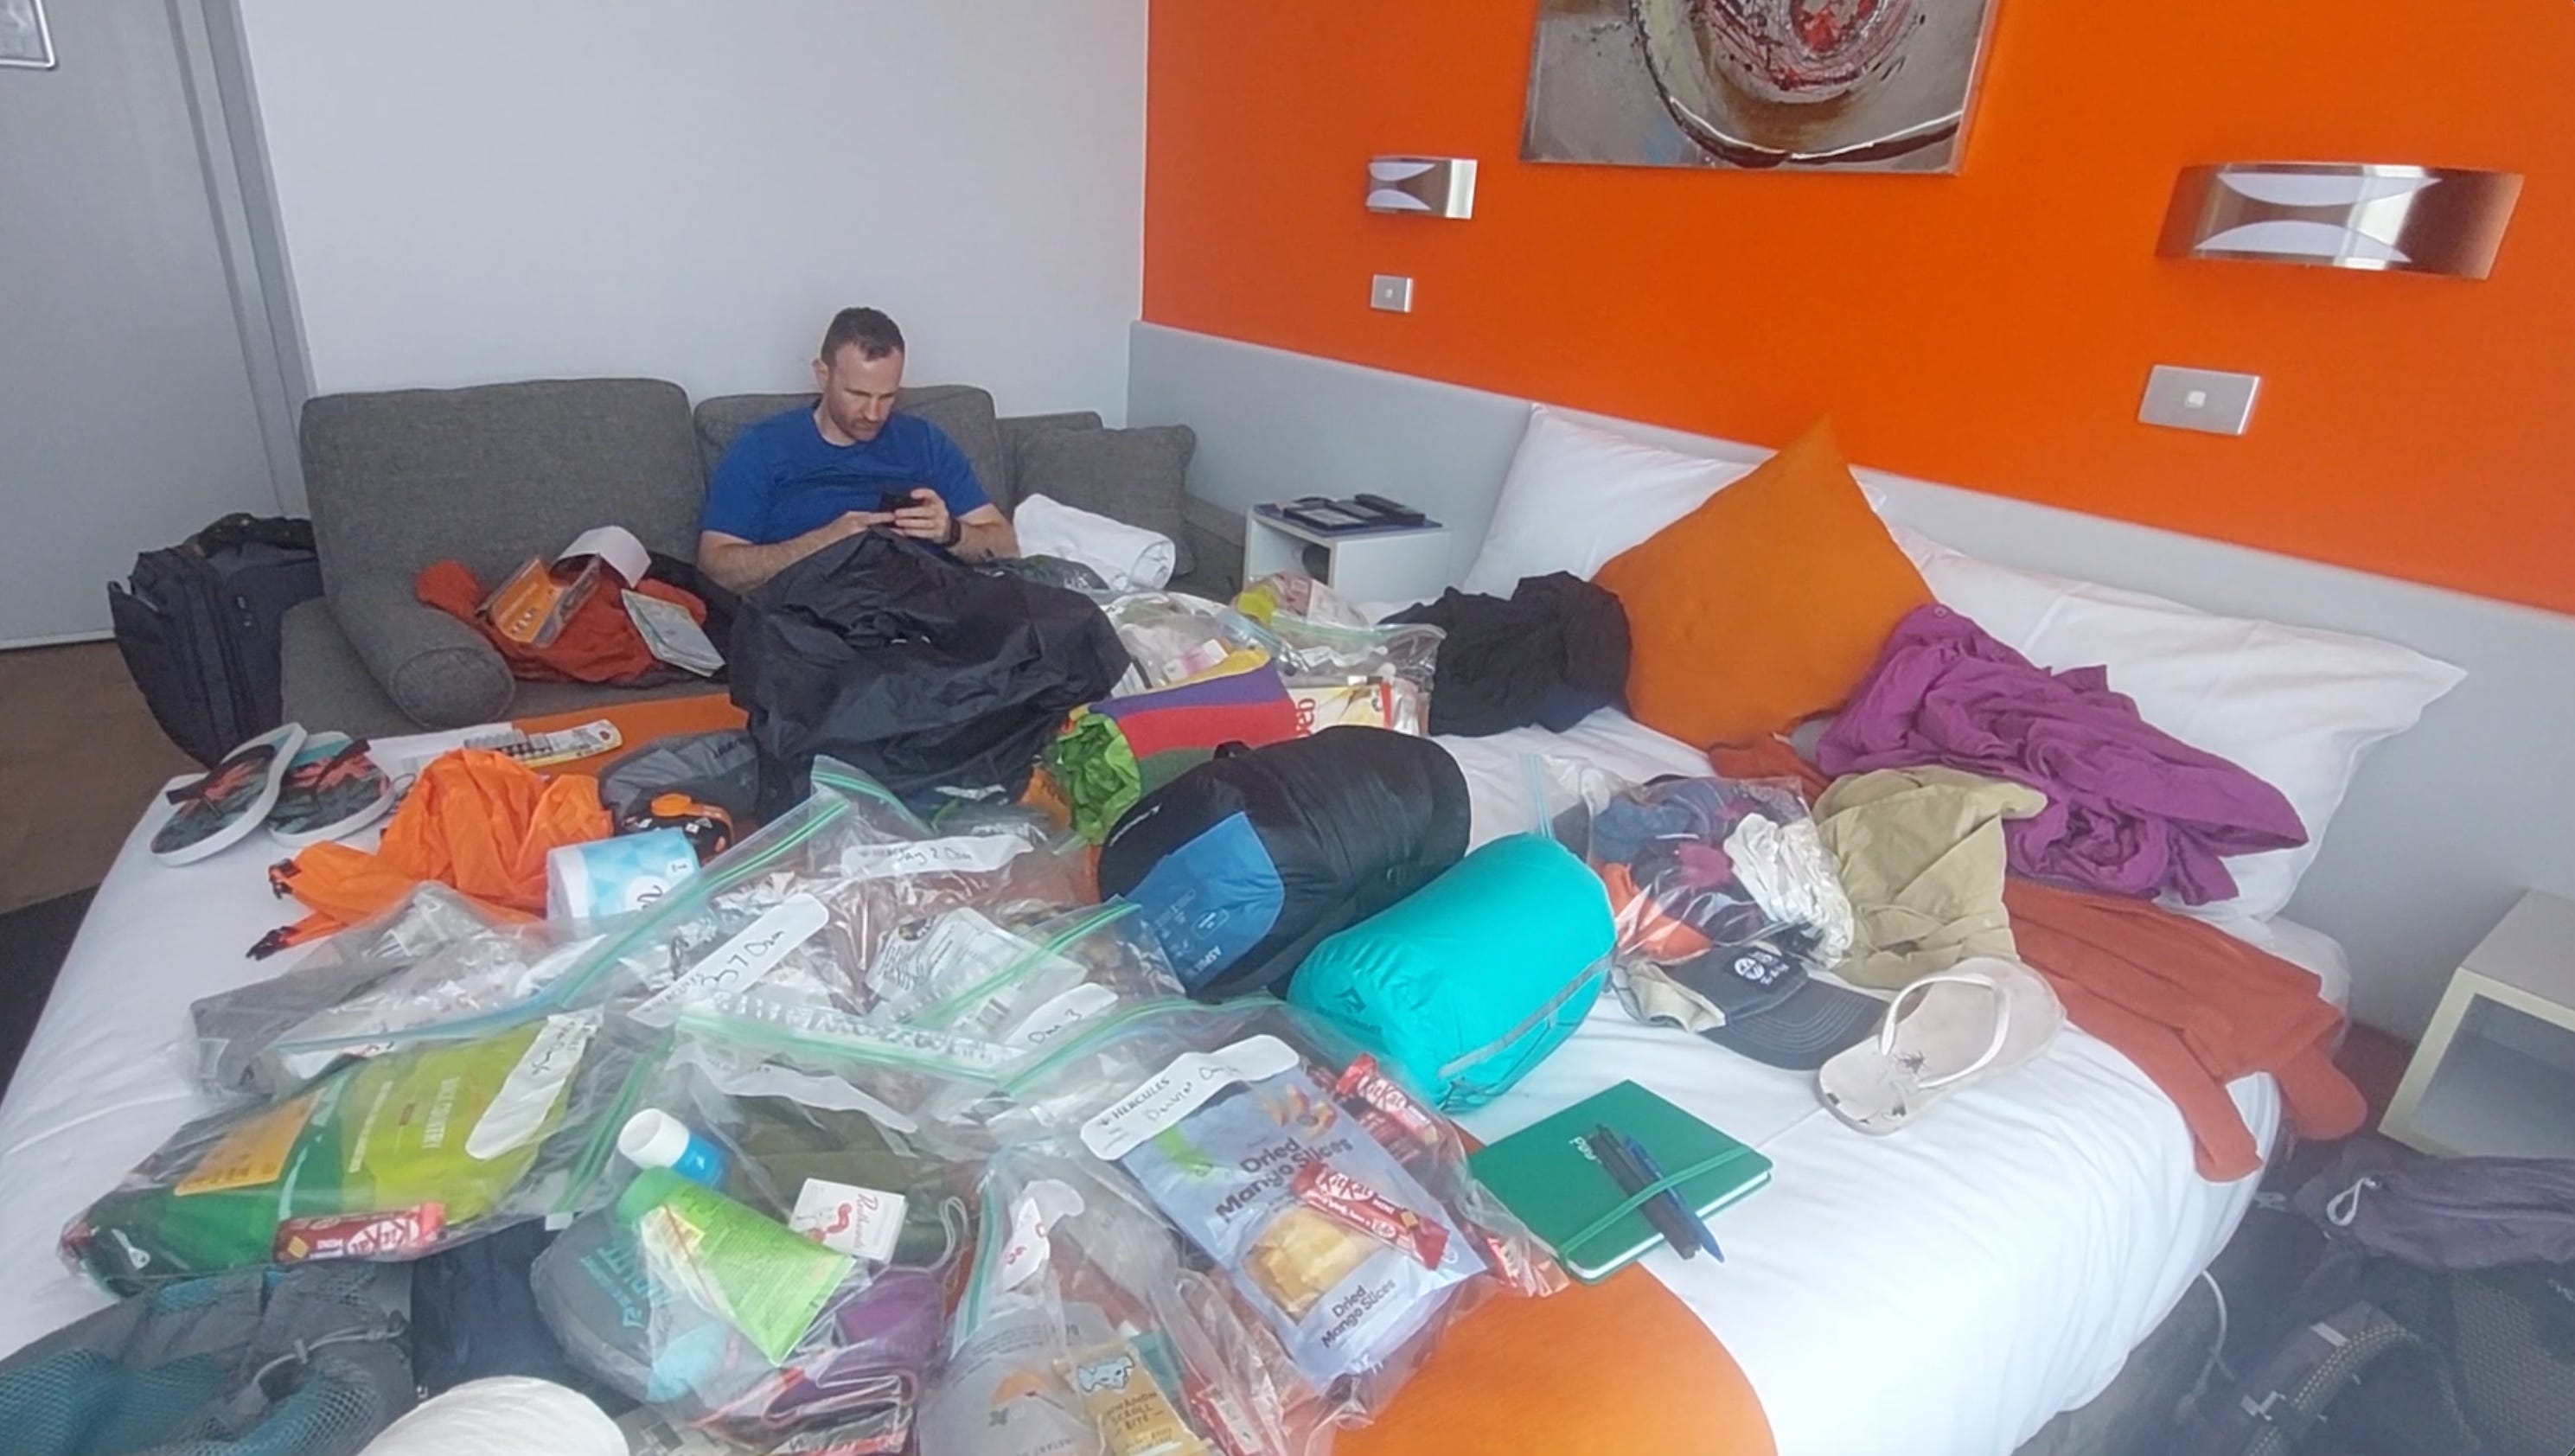
Packing Guide
Pack for a regular 7-day hiking trip, including the must-have PLBs. You can rent these from Hobart city; MacPack, Kathmandu, Service TAS will have some available devices.
On top of that, here are some more tips:
Go as light as you can without compromising on safety. Going lighter will help you to be more agile on exposed rock scrambling sections. So, might want to forget about your camping chair, reading book, etc. We read online to carry 12kg max for women and 18kg max for men. Remember, when soaked, your bag will get heavier. But again, don’t compromise on safety.
Buy some sturdy gear! This includes your clothes. The rocks, bush bashing, mud — everything gets damaged. I was surprised my hiking pants held up well. But my gloves were ripped into pieces. Knee pads are not commonly mentioned, but given how many bruises I had from the trail, I think it’s a good idea.
Bring a 4-season free standing tent due to harsh weather and platforms.
Headlamp + backup batteries: If you have plans to combine the last 2 days and exhaust your legs, you will need to see the trail. If you prefer to not torture your legs, you may need to pee at night.. and see where you pee.
First aid, including strapping tape: This is a tough hike. My legs and elbows were covered in bruises, swollen. People we met on the trail were taking panadol to ease the pain. The winds can be harsh, which can cause headaches. We climbed on rocks more than we properly hiked, and this is very straining for the joints. Blisters are common, although we didn’t have any. Better be safe than sorry.
Full wet-weather gear: Include gloves and a beanie, especially if you are prone to frostbites. Pack cover is a must-have. Not just rainjackets, but I also really recommend rainproof pants (which we didn’t have at the time and got drenched, cold, instead).
Rat fight kit: This can include food bags suitable for hanging + a string to hang. It can include scent-proof sealed food bags to contain trash. We really recommend using peppermint oil on the tent and on food bags. It will feel like Christmas every day, and keep the rats away. Unless you feel up for playing ‘Tom and Jerry’ each night.
Bring emergency spare food: The weather can change rapidly. You could see snow in the middle of summer. You could seriously be stuck on Day 4 for 2 days. Don’t know about others but I cannot stand hunger. The nature of hiking (burning 2000+ cal per day) already means I’ll be on an extreme deficit, wouldn’t want to make it even worse for myself.
Buy a GPS watch if you can. Optional, but really handy! There are plenty of side trails that some people have explored, sometimes, accidentally, due to poor markings in a few sections. Navigation can be a bit challenging at times, especially in exposed sections with steep climbs. We lost about 30 minutes on 2 days, and took a dodgy way down on 1 day, due to navigation challenges. On one of these days, friends we met on the trail with a GPS watch called us to turn around.
Bring a 15m rope: If this is your first time on the trail and you are not a pro outdoor climber with heavy bags, this is a must-have. Some people (only tall men with climbing experience) like to argue against it because they don’t want to be slowed down. Boohoo - this is not a race! No one is going to give a medal to the first arrivals in each campsite. We met with a group of 4 outdoor rock climbers who brought a rope just in case, but did the trail without using it. Despite not stopping for lunch breaks (like we did), they were only 1 hour faster than us. There is no risk of pack hauling. It is fairly simple to tie your bag to a rope and pull it up. On the other hand, steep climbs during rain and wind, when the rock under your foot is slippery, carries serious risks, and the weight of the bag can make you very unstable. I genuinely see no upsides in being stubborn about never ever taking off your pack. If the trail is so easy to you, then your only loss is carrying additional weight. Especially if you haven’t done a trail before, safety comes first!
Common debates about gear: These are optional items you may want to consider.
Weather forecast devices: Sounded great in theory, but friends we met on the trail used one, and it was inaccurate every day. I am not convinced.
Hiking poles: I thought they were very useful on Days 1, 2, 3 (50% of the time), 6, 7. But on days 4 and 5, you need knee pads more than hiking poles, as you are climbing not hiking much. If you get a mild lower body injury, using hiking poles as a crutch could also be helpful. And they take a bit of weight off your feet, which is something you may want on days 6 & 7 after two very challenging days.
Gaiters: You need them for the 1st and last day. If it rains while you are hiking (which it most likely will), then the trail will get more muddy. I only used them for 2 days.
Trail runners: Yes, they are less bulky than hiking boots and will help with climbing certain sections better. Because they help with agility, I like them. But, if you are not used to carrying a heavy pack and hiking for 5-7 days with trail runners, don’t let this be your first time. Your feet will go through hell and you may end up with an ankle/achilles injury. So, we didn’t bring them.
Despite getting some angry comments for this on my previous posts...
PROs of going ultralight on the toughest Tassie trails: -3kgs, you may arrive to the campsite 1h earlier, your body will feel less tired.
CONs of going ultralight on the toughest Tassie trails: you might die. And you’ll certainly have an uncomfortable time.
Everyone’s risk and comfort tolerance are different. Hope I made my stance clear. Ultralight is great on some trails, including some Tasmanian trails. Ultralight on WAT could contribute to the monthly PLB call statistics of the state.
The counter-argument is that carrying extra load will increase your chances of death or injury, because it slows you down, tires you out, and it can be more challenging to balance with heavier weight on your shoulders. I get it. And that’s why the “Training Guide” section makes it very clear that most people should NOT be attempting WAT.
If your success of completing this trail is solely depended on caloric restriction, a shitty bag, shitty tent, inappropriate equipment, then do not attempt. You are not ready. And nature may not pity you.
Walker’s Notes — Day by Day Tips
This is a spectacular trail, and an unforgettable journey.
It’s annoying but your experience on this trail will be highly dependent on the weather. The 5.5m rock face to climb might be adventurous on a sunny day, but it can become dodgy during a rainy day, and dangerous on a stormy day. Trail and weather conditions will determine your speed.
Day 1: It’s possible to combine days 1 & 2 if you get a morning start. Watch out for the leeches. Easy, flat, repetitive, can get muddy after rain. This is your easiest day. Make sure to follow the Port Davey Track at the split off.
Day 2: The start is easy, flat, repetitive, can get muddy after rain. The Alpha Moraine climb is continuous (power to the legs and glutes!), but the first 3/4 is pretty reasonable. The final section is much steeper with a bit of scrambling. We took our hiking poles in one hand. This is your 2nd easiest day. If you find this day challenging, go back immediately.
Day 3: Quite a technical day, but I would still call this part of the trail a “hike”. This day will give you an idea of what is coming up over the next 2 days, but if today is your limit, then the next day will be 3x harder (so, go back). You’ll think about where to put your foot, your hands, and how to best use your hiking poles. 50% of the day will require you to put the hiking poles away.


We got slightly lost near Lake Square, because the markings were worn off and there was a lot of mud. Follow the piece of wood sticking out, down to a small creek. It does not feel intuitive, but cross the creek and you will see your next marker. Then, you will see a narrow steep climb up.


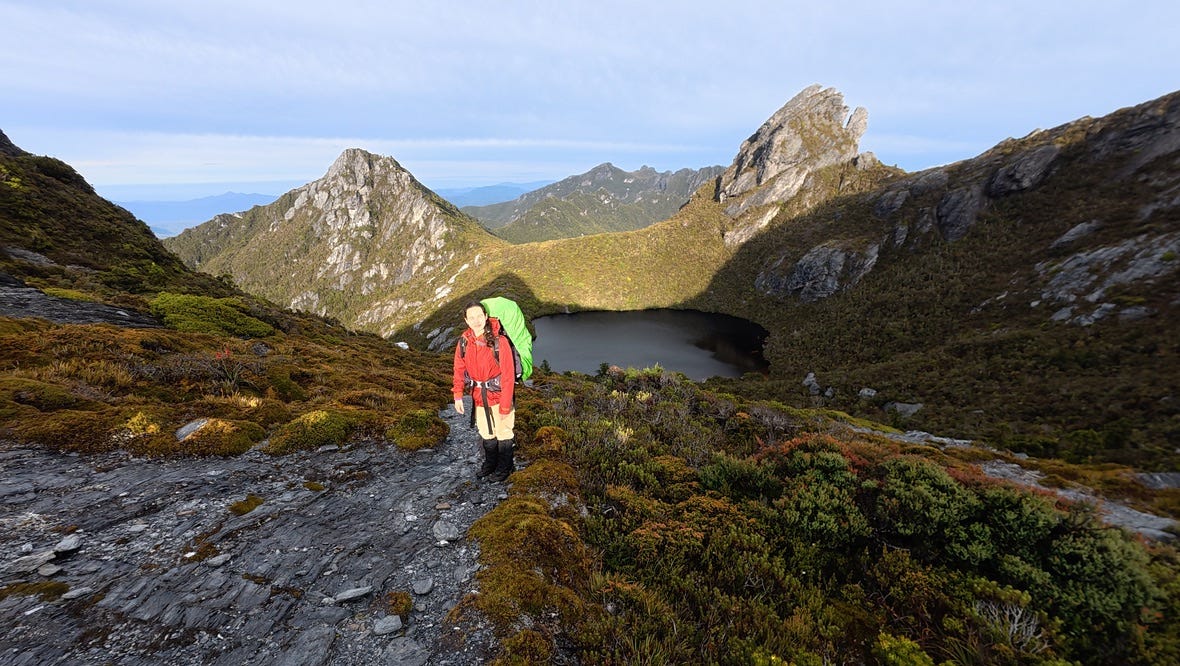
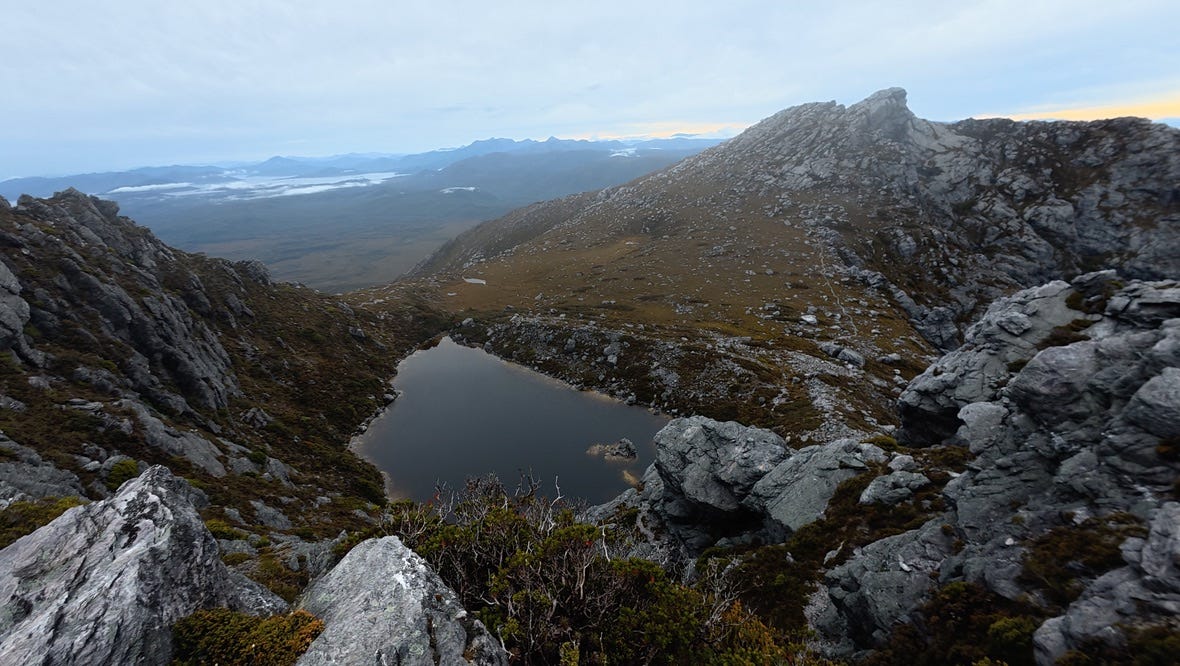
This day is full of gorgeous views! I called it the “fantasy land”. Some people call it the start of “Jurasic Park”.


The descent into Lake Oberon was the first dangerous section of the trail. Sheer vertical drop. David said, “if you slip coming down there and take a tumble, I don’t think you’re walking out. Best case, you get airlifted out.” But it is not a long section, and a nice boardwalk follows it down to the campsite, which was a pleasant surprise. Rats in this campsite have no shame. Be careful.


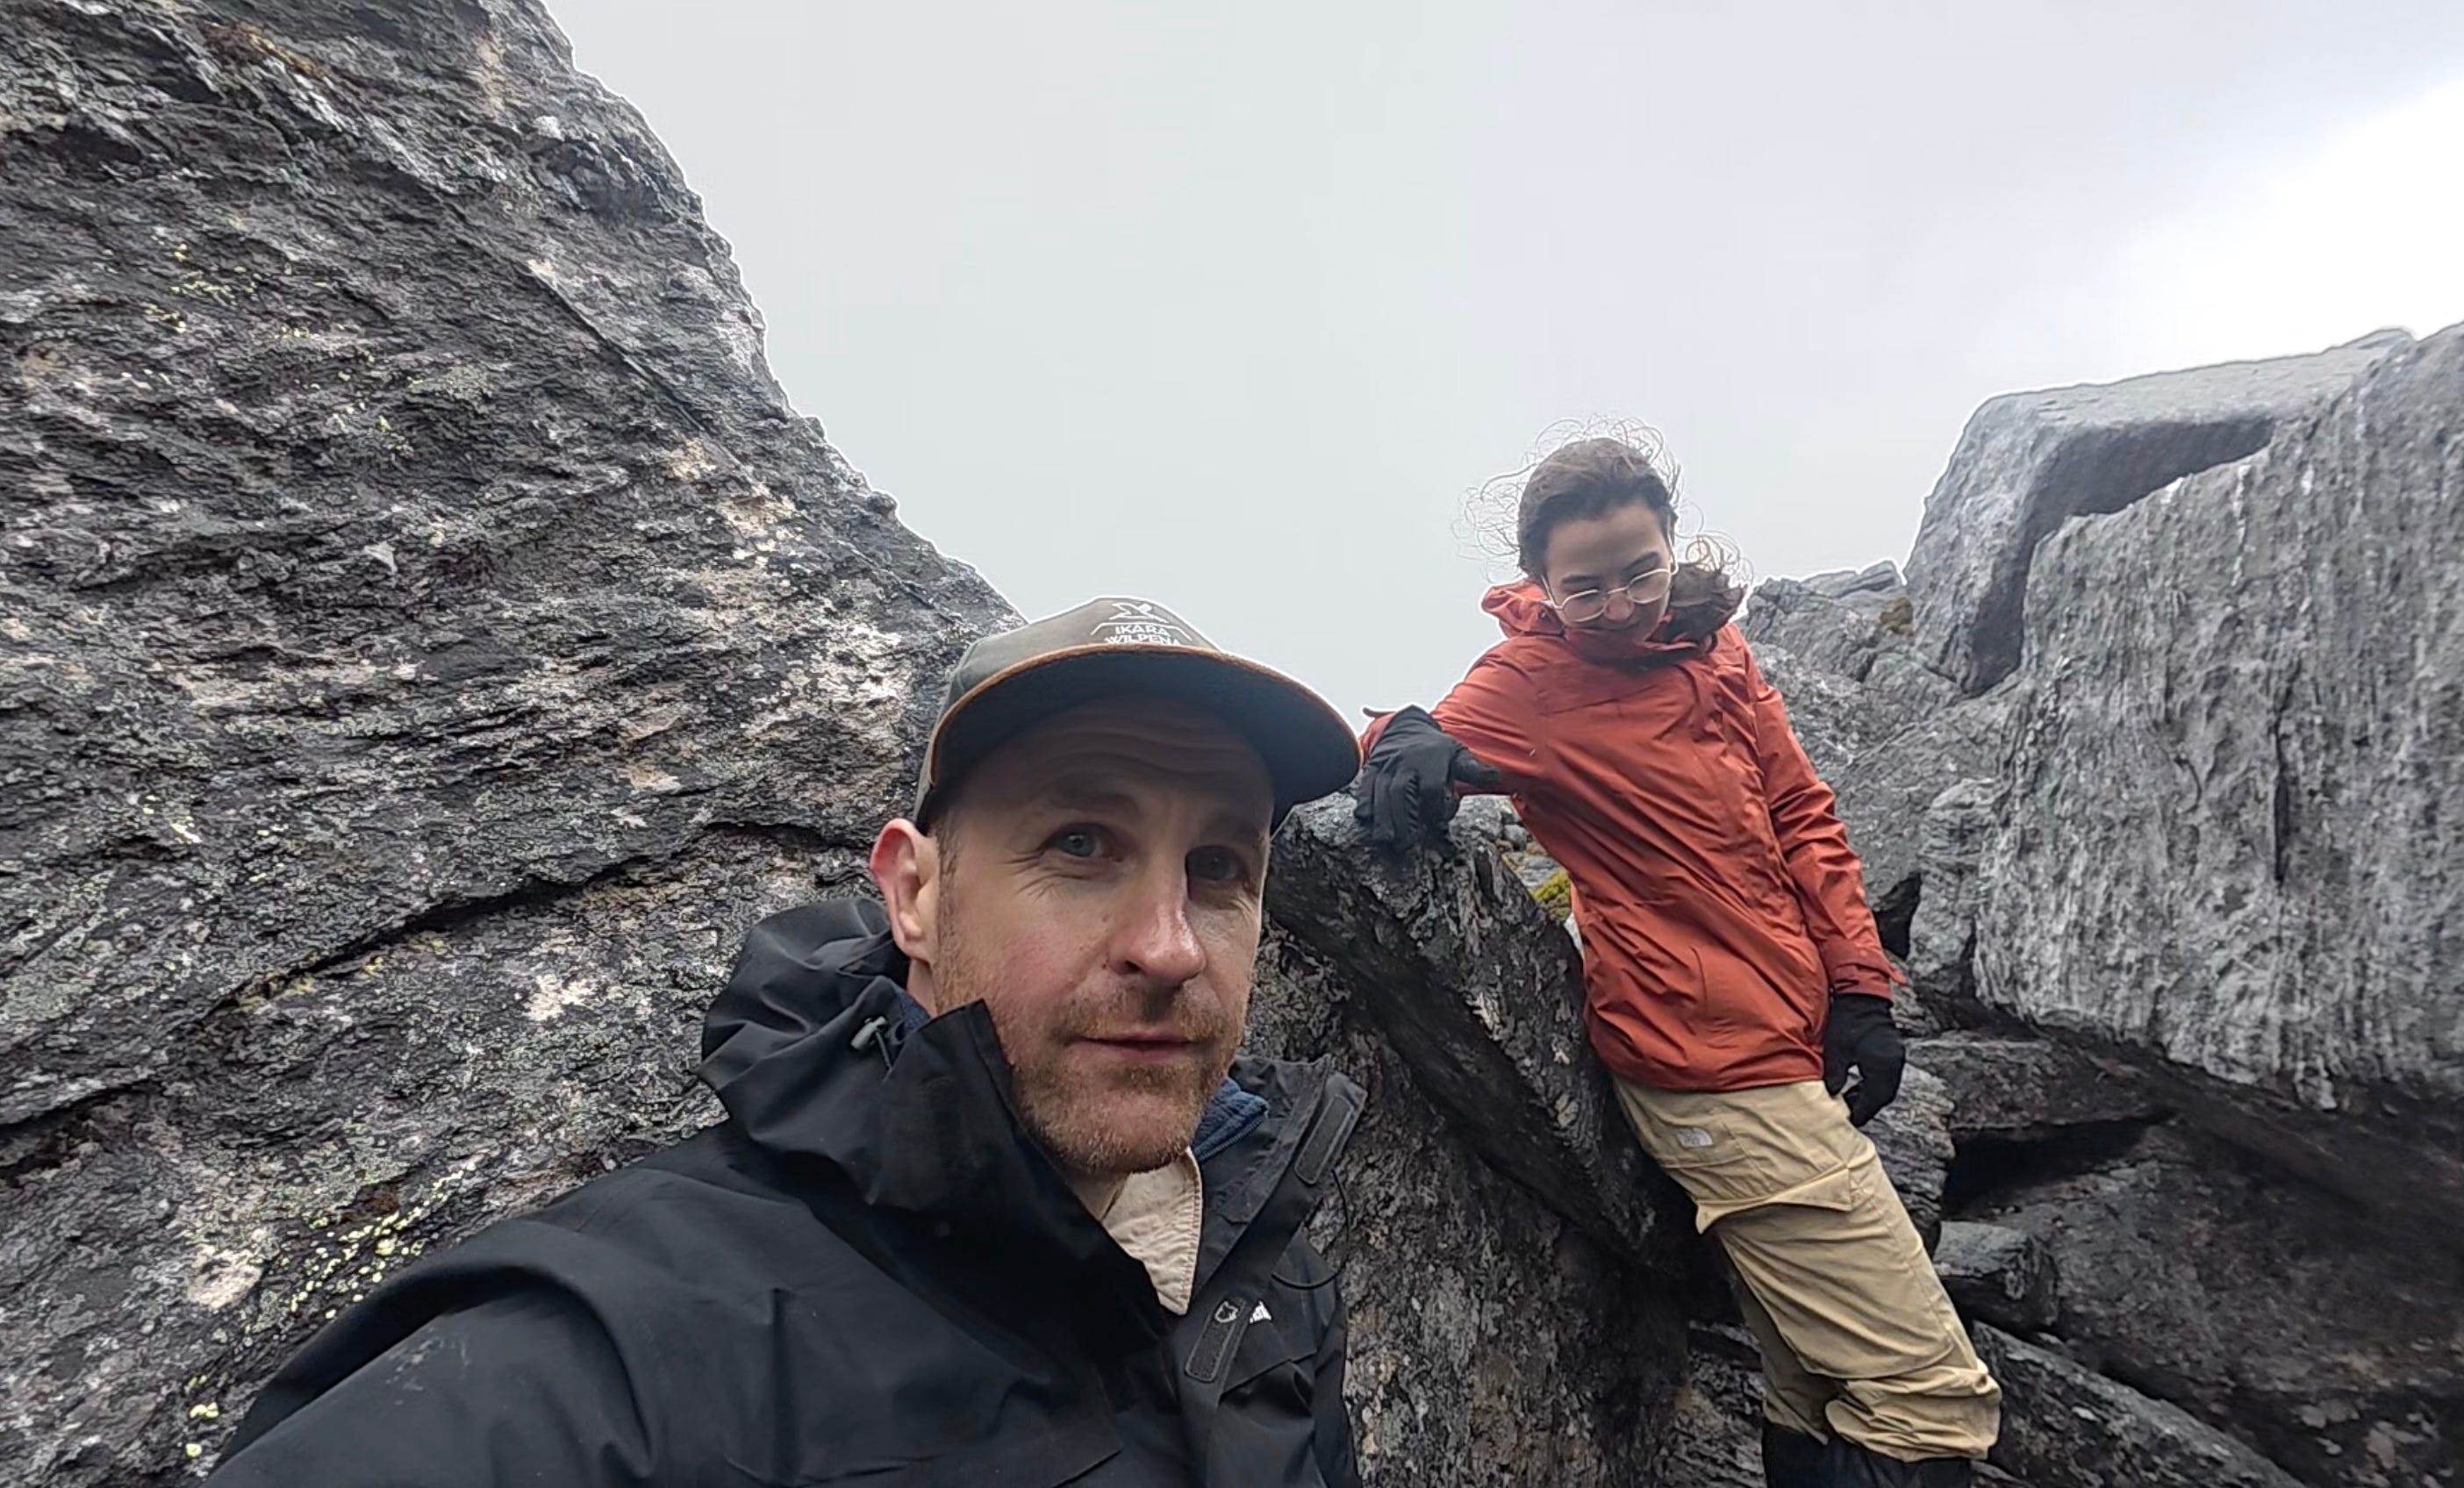
Day 4: The most thrilling day of the trail. VERY technical. Depending on the weather conditions, it could be described as very adventurous, daring, thrilling, dodgy, dangerous, risky, crazy. Unfortunately, we got the rain and the wind.

Getting out of Lake Oberon, you will face a nasty, steep, ~5.5m rock face. You’ll need to climb up there. Ropes and pack hauling are highly recommended during rain. This was the only section on the trail that I felt close to death (got my heart racing), and I admit, being short (difficulty reaching to hand holds), constant rain and wind did not help. In retrospect, falling from that climb would most likely result in a bad injury, not death.


Watch out for the narrow section with very steep tall rocks facing a cliff. Do not try to climb on the rocks facing the cliff. That is the wrong way and you can die if you slip trying to climb that.
Circle around it; there will be a safer and more sensible way to climb. You will come across a big round rock (2.5-3m tall). Climb over that. Might be easier if you take off your pack and pass it up.

The entire day was steep climbs and descends, not much “hiking,” and no use for the hiking poles. Expect to use hands, knees, elbows, and sliding on your ass. My knees were covered in bruises by the end of the day.

The “hole in the rock” is not difficult, but a bit annoying as you have to take off your packs (the hole is too small to fit through), and pass them one by one. A bit awkward.
Coming down from Mt Capricorn is a very steep and soily descend, and we slid on our asses most of the time. Heading to High Moor campsite from there seems close on the map, but it is a long drag. Continuous windy climb, but the scrambling is over.


The wind around High Moor makes you feel dumb. Constant blowing at your face is tiring. There is nowhere to hang your food at this campsite, but I think the rats are sensible enough to not climb up to High Moor. John Chapman is very optimistic about the estimated time to complete this day. Give yourself plenty of time; make sure to leave the campsite early. A lot of people we know finished about 1 hour later than the duration on Chapman’s book.


Day 5: The “hell” day. Coming out of day 4, when you are already exhausted, bruised and beaten up, the last thing you want is going through the same day but a longer drag. That’s how day 5 felt; it invites constant swearing. Less of the crazy scrambling where you might slip and break a bone, but more of a hard muscular endurance test.
Coming out of the campsite, we missed a turn and came to a 2m drop, looking down to a narrow ledge. Clearly, others have also missed this turn, as there were footprints near us. We later found out that this was not the right way. However, it is possible to go down there, which we did.
The Tilted Chasm is commonly mentioned in walker’s notes. It wasn’t difficult or risky, even under wet conditions. Just a weird, technical descend. Please remember: there is only one tilted chasm! If you feel like you found another tilted chasm, you are on a shitty muddy steep side trail, descending down to a lake. Please don’t make this day any more difficult to yourselves, like how we did. Friends we met at the campsite saw us and yelled out; we were so lucky they had a GPS.


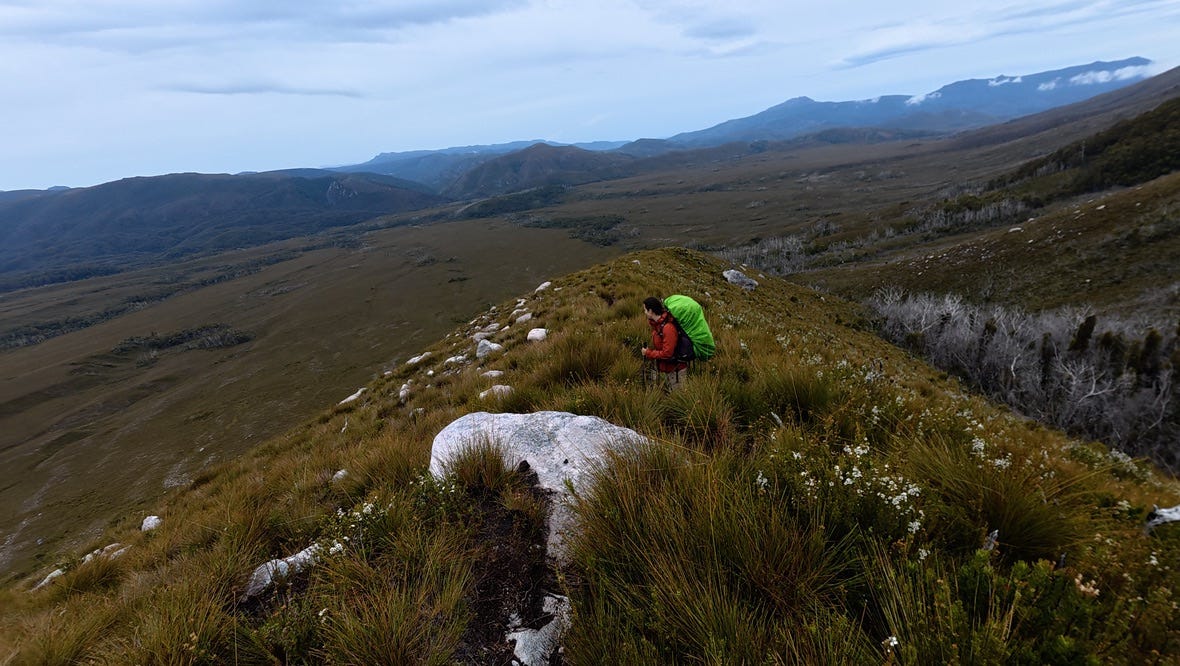
Once you clear the Dragon, you’ll be about 1.3km in. Huge effort for only 1.3km, but don’t complain yet, because the rest of your day will follow the Dragon’s “Bumps”. On our YouTube hiking video, you’ll hear me saying, “the Bumps never ended!” That is correct. We saw ourselves climbing up and down the muddy bumps for the following week after we left the trail. They leave you with mild trauma. Imagine bushbashing while sliding on your ass down soft soil and occasionally having your arms hit rocks sticking out. Then, climbing back up that, and sliding back down, and climbing back up, about 6 times.. or until you lose your patience and start yelling, “f*ck you bump number 5!”


Towards the end of these bumps, there is a dodgy, exposed, slippery, tilted rock. Yes, you have to go over that rock. This is the 2nd time that I felt close to death (video showing this section is on YouTube). Admitting that the section was not very difficult, and I had my heart racing because it began showering during that section and the rock was slippery. So, what would have been my safe foot holes were no longer safe. I recommend pack hauling during this section, as crossing that rock requires a balancing act; you have to lean your body towards the rock and slowly shuffle forward. A bag that sticks out, especially during wind, can make you lose balance, and there seemed to be a cliff at the end of the rock, so it’s not like you’ll have a soft landing. When you see a trail that climbs to a mountain summit, you can be confident that you have left the “bumps” and are now on Mt Taurus. After the summit, expect a rocky descend.
Soon after, you may feel confused and lost. Find a cliff with one tree sticking out. It will have a blue ribbon tied on it. That is a trail marker. Let’s call this “the Crack” because as you approach the ribbon, you’ll notice a steep tall drop down a crack on the ground. It doesn’t look like a trail, but you need to edge yourself down the crack. It’s not hard or dangerous, as there are plenty of foot and hand holds - just edge yourself slowly. We took off our packs and threw them down the narrow chute. (Video showing this section is on YouTube).
The trail gets much easier after that point. You’ll be able to see Haven Lake from a distance. Again, John Chapman was quite optimistic about the estimated time to complete this day, and we found that most people actually finish 1 hour later.
Day 6: Steep and hard climb out of Haven Lake. Views are gorgeous at the top.


Day 6 is a big relief though, as it is significantly easier with better trail conditions than the past two days. This is a beautiful day, but I was unhappy about my injured wrist which was constantly aching. Coming down to Lake Sirona is challenging and tricky at the top, but the rest of the descent is doable.
Expect to climb back up to Mt Scorpio. From Mt Scorpio, you’ll notice a half cylinder looking path - a steep descend - that is the start of the Kappa Moraine. The initial part of this is challenging. Afterwards, you’ll notice a trail split off to the right for those who wish to extend their trip.
From that point onwards, the trail gets super easy. Downhill on flat ground, through long grass. Fierce river flowing down on your right. Eventually, you’ll come to flat land, and follow a boring trail similar to day 1, with occasional creek crossings in forested patches.


One of those foresty sections is called the 7 Mile Creek Campground. It joins back to the Mackay’s Track. Some of those foresty sections can be very muddy, mossy, wet and slippery, so be careful. Easy to have an accident when you are tired from the previous days.
Day 7: Same as day 1. You can combine days 6 & 7 together if you get an early start. It will be exhausting for your legs, but the trail is super easy to follow, so it’s doable.
Despite being completely beaten up after this trail, we felt so powerful. It is empowering to overcome big challenges. This is the craziest adventure we have ever done. But I am sure more will follow.
My wrist was ok after 1-2 week of rest. It was very swollen from overuse. I have seen my lowest HRV ever at 12 on this hike. But we both bounced back up and recovered pretty quickly.
Share this post with your crazy hiking mate as a challenge to aim for.
If you are dreaming about completing the Western Arthur’s Traverse, what’s on your mind? What do you need to know, to make this happen? Let me know in the comments, or DM me.