
Rees to Dart Track (South Island, NZ) Overview

Overview
Length: 74km, one-way.
Duration: 4 days. If you want to do the Cascade Saddle side trail (only a smart idea during clean weather, which is a 50% chance), 5 days.
Seasonality: this hike is in an alpine region where the weather impacts the difficulty and safety of the hike (lots of river crossings, steep narrow climbs etc). Technically you can complete this hike during mid November-April but I would recommend you aim for a sunny and dry week. We hiked between 17-20 April and were very lucky to not go through heavy weather.
Grade: 5 (and I totally agree). To break down the days in terms of difficulty, we felt that the first day was 3.5, the second day was 5, the third day was 4 and the final day was 4.
Terrain: ankle-deep mud, waterways with running water, cattle flats (farmland), lots of river crossings (ankle deep, but with rain becomes calf deep), rainforest walk with some tree root climbing, lots of rocky surfaces, steep ascend on narrow pathways, landslides (due to avalanche zones) and fire trails. It’s a wide range!
Skills Required: steep climbing and descending, muddy and wet terrain, high fitness level to be able to complete long distances for 4 days.
Climate: alpine climate. During mid-late April, daytime weather was between 6-10 degrees. Heavy clouds, very misty, especially when completing steep climbs the trail can disappear.
Animals on Trail: we came across cows, sheep, mountain goats, deer, wild rabbits (fattened up for the winter), different types of small native birds that are endangered, and small fish.
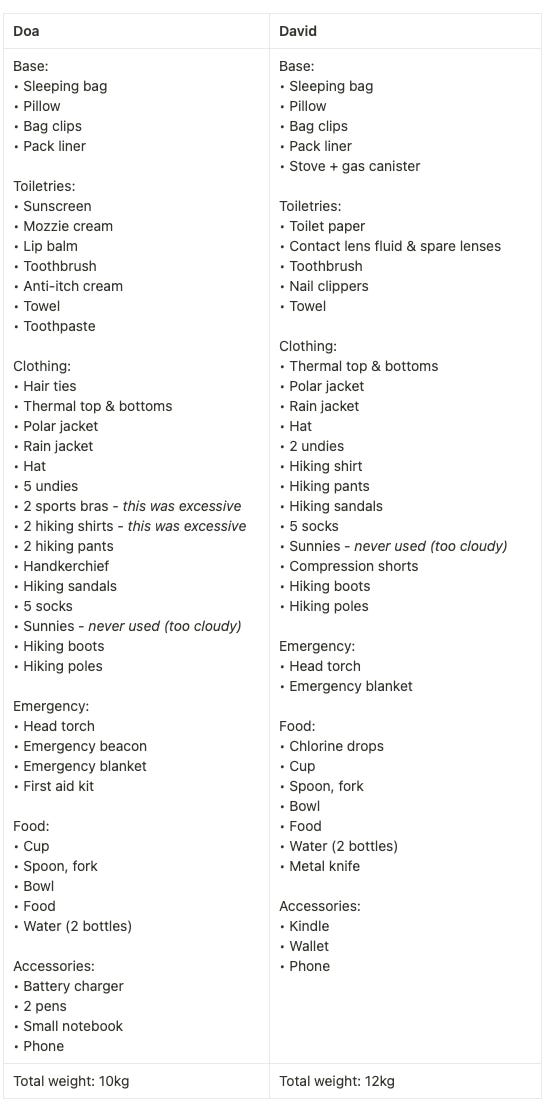
Highly recommend you bring PLD (personal locator device), hiking sandals, gaiters, lots of socks, hiking poles, hand warmers or gloves (if you are the sort with frostbite tendencies). Find our full gear list at the bottom of the page.
Popularity: you can encounter between 6-30 people each day on the trail depending on the season. We had 7 other people in the first hut, 7 others in the second hut, and 9 others in the third hut. On the last day, we saw 14 people on the trail. Yet, this hike is still considered to be a ‘hidden gem’ trail in the South Island, given the fact that the Routeburn Shuttle bus transports about 30 people every day during the last week of the hiking season (plus the ones who arrange private travel).
Accessibility: this is a point-to-point track. We completed it from Rees to Dart but would recommend completing it from Dart to Rees instead. That way you delay having soggy feet to the last day and can climb steeply rather than going through steep drops/descends (which felt yucky to go through). However, shuttle bus timetables don’t suit this arrangement, so you may need to organise private transport.
Both Muddy Creek (Rees) and Paradise (Dart) can be accessed by a shuttle bus. It will cost $150 per person. These buses depart from Queenstown and Glenorchy.
If you are a big group or family, it may be worthwhile to research car rentals and organise someone to drive the car to the arrival point. We met a family from Auckland who had this arrangement for $200, which was cheaper than buying individual tickets for the shuttle bus.
Additional Links: https://www.doc.govt.nz/parks-and-recreation/places-to-go/otago/places/mount-aspiring-national-park/things-to-do/tracks/rees-dart-track/
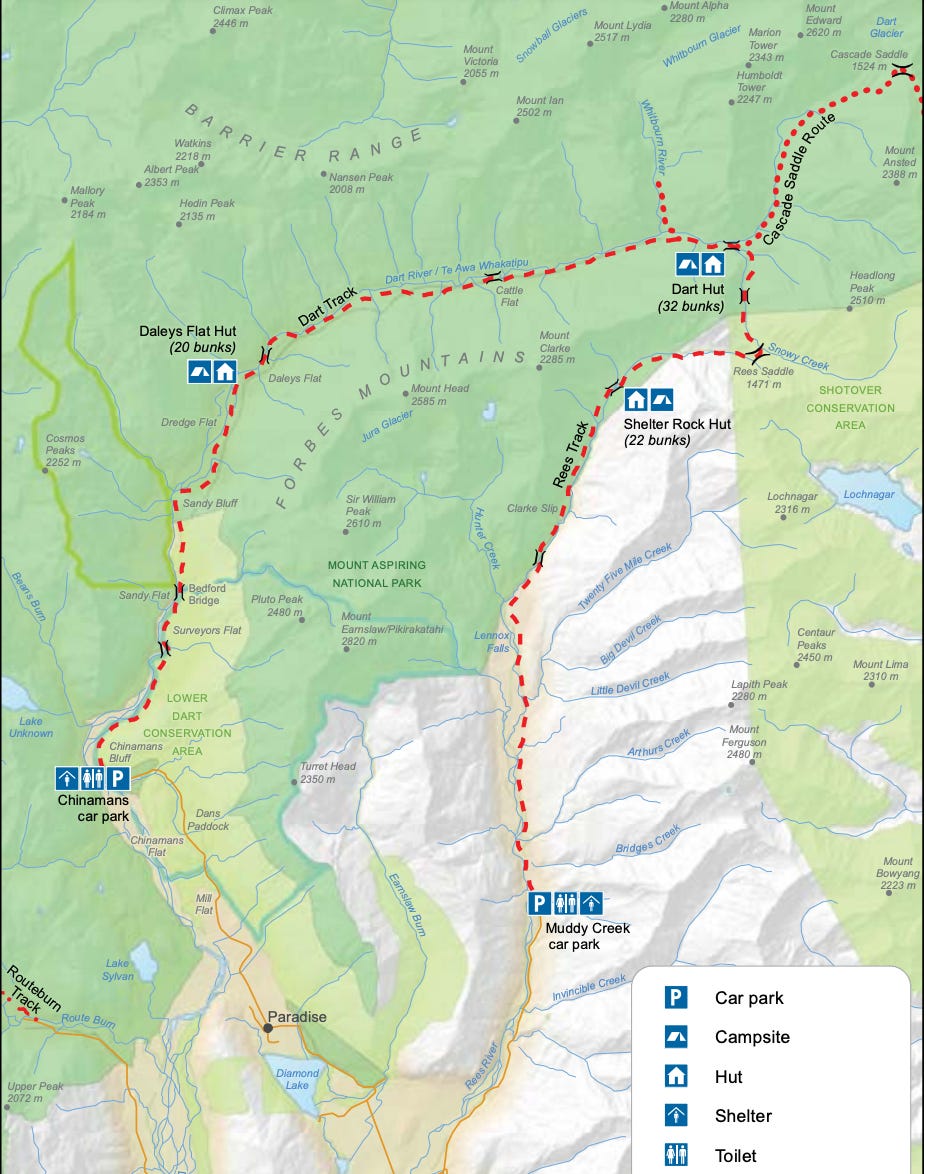
Warning: the track passes several avalanche zones and rivers. The river crossings do not have overhead ropes to hold. Be conscious of rainfall and weather; a handful of people have died on this trail wanting to complete their hikes in adverse weather. Be safe. Under good weather conditions, the river crossings vary from ankle to calf-deep with moderate currents.
Warning signs were everywhere about avalanches.
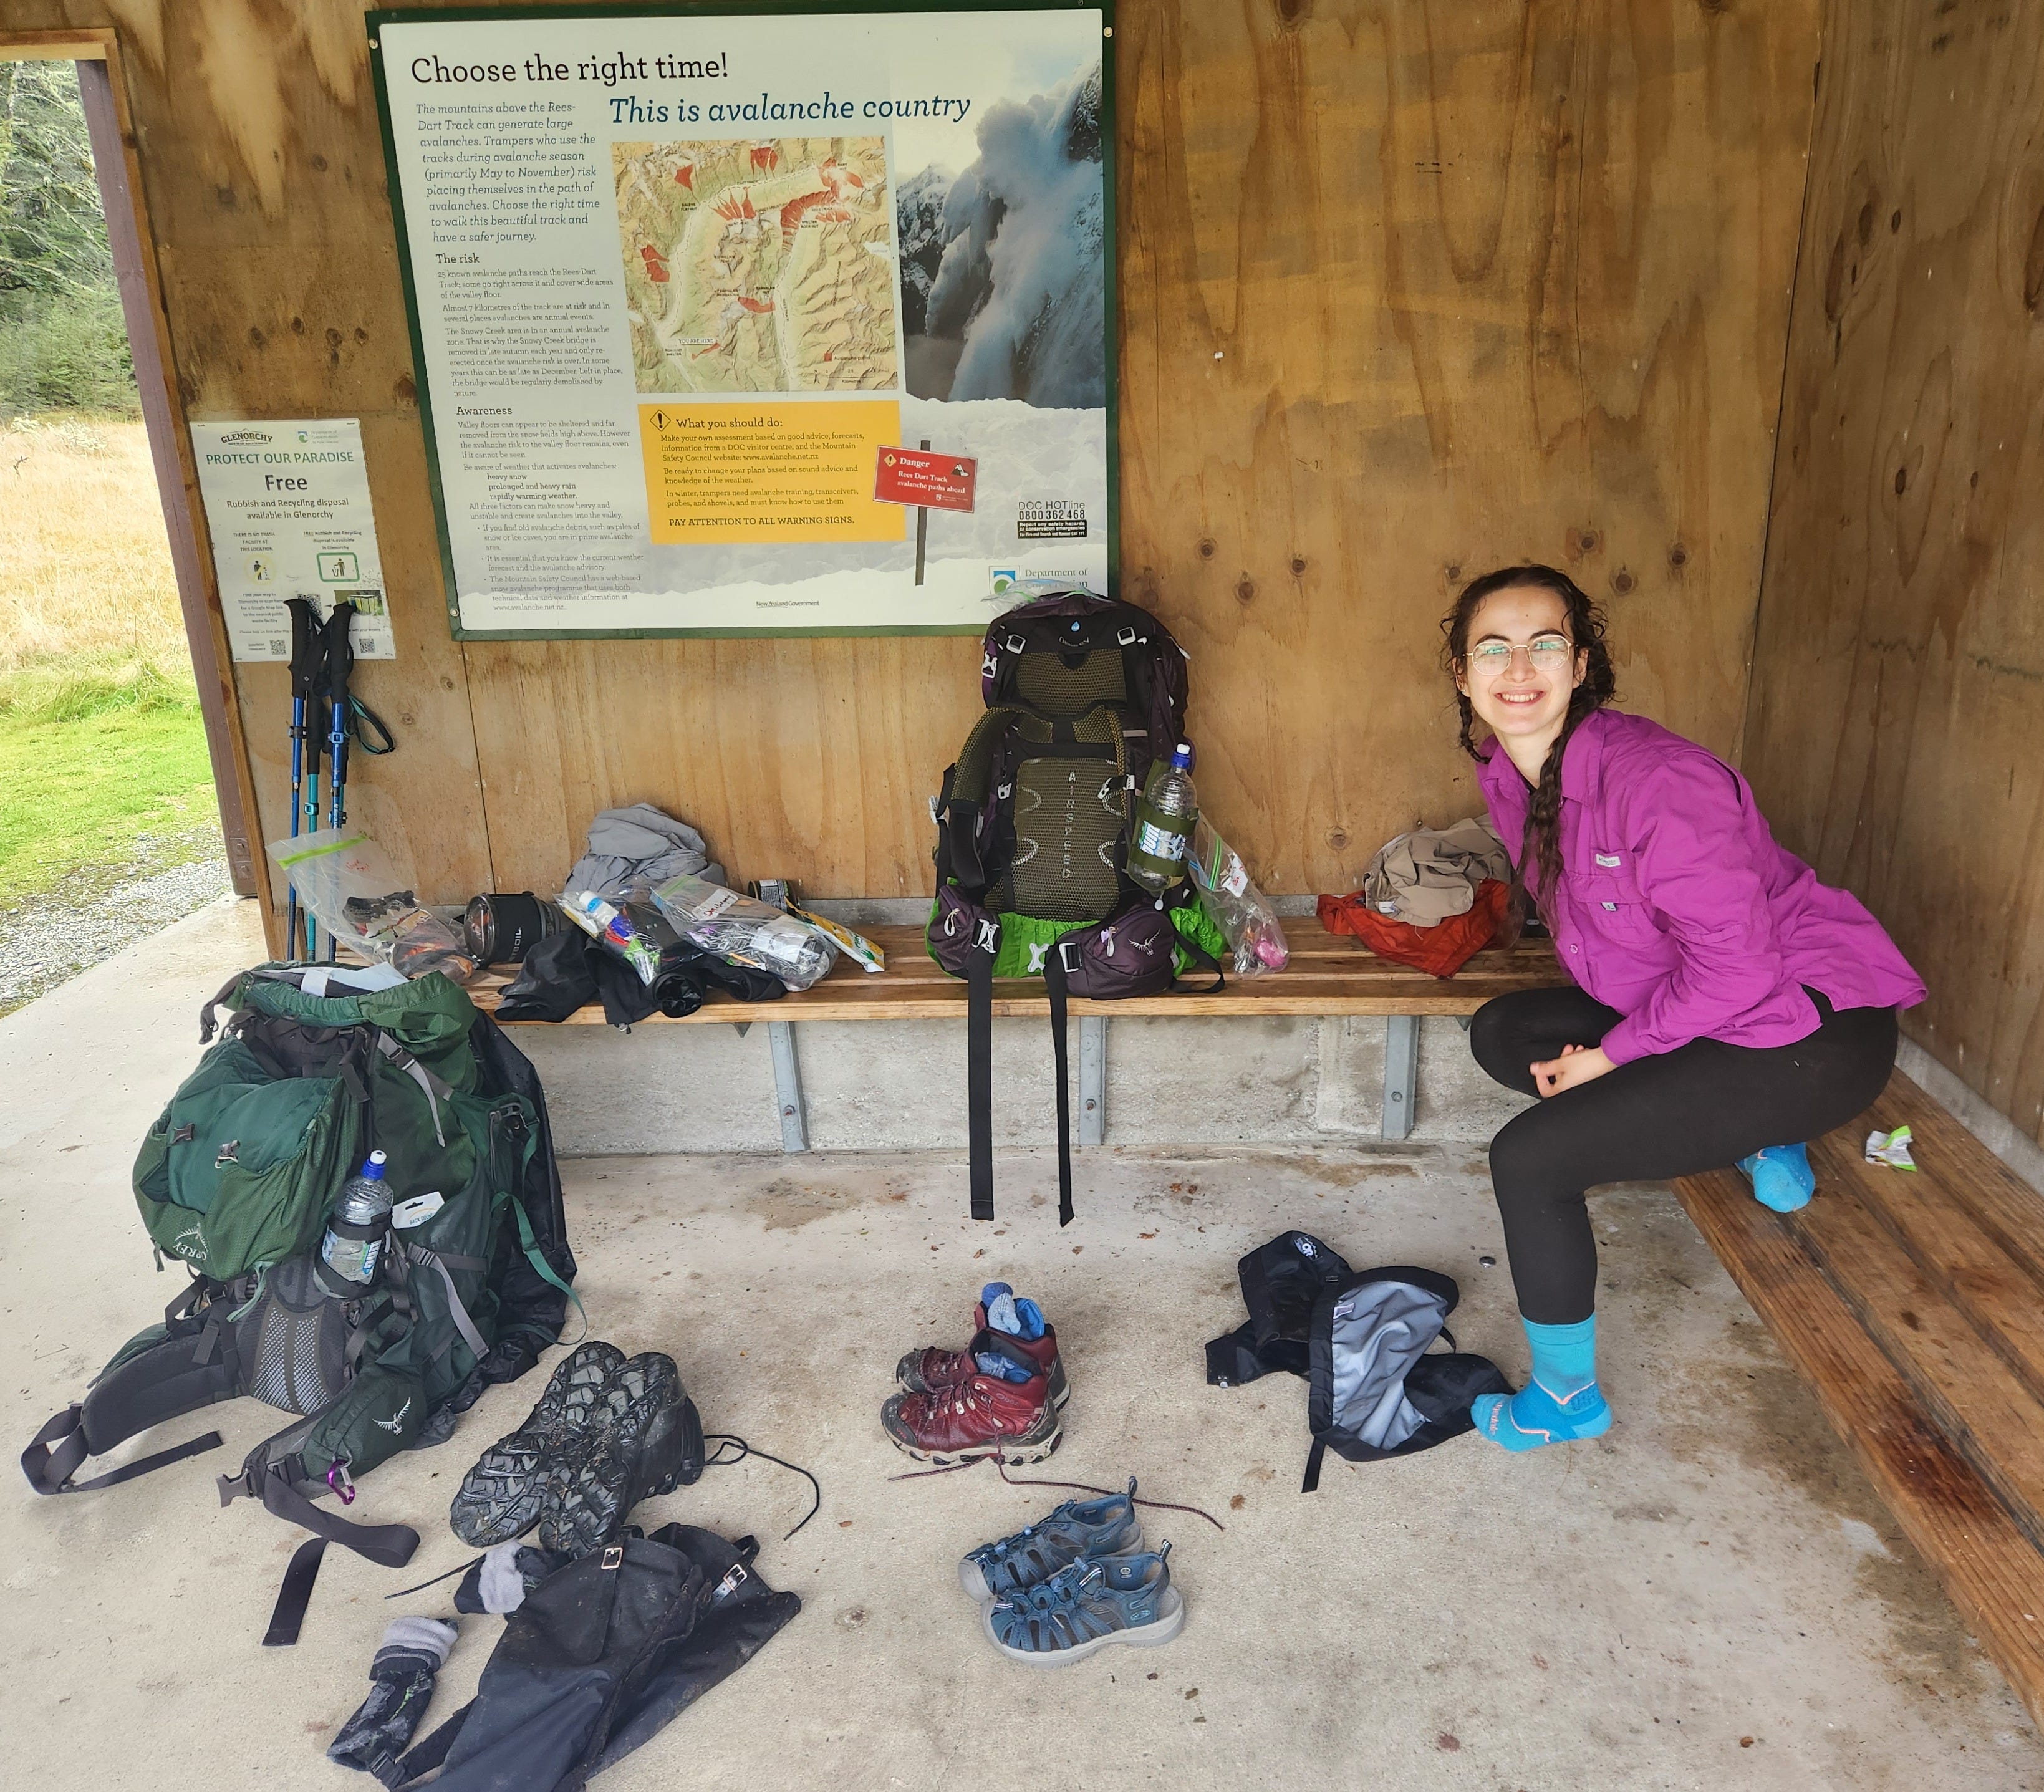
Warning: the route between Shelter Rock Hut and Dart Hut is weather-dependent. The side trail Cascade Saddle is even more weather-dependent. These are the most difficult parts of the trail with steep narrow climbs (cliff edges) and sudden drops/descends. Most of the year, some parts of these trails are covered in mist and cloud, which makes visibility challenging.
We decided to complete the Shelter Rock Hut to Dart Hut route (ranging from 1-2mm rain, gentle breeze and very cloudy) to get to our next campsite (missing the showers which began at 3.30 pm) but did not attempt the side trail from there (with forecast showing 6-8mm rain, gentle breeze and very cloudy).
The ranger at the hut said that we still took some risk given our visibility was quite poor due to the clouds and how we missed the showers by 30mins - 1 hour. It was recommended against attempting the side trail given the forecast. While the weather conditions were not difficult for a regular hike, they proposed risk given the terrain we were hiking on.
Do NOT attempt these two trails in the afternoon. These are not routes where you can turn on your headlamp and walk through in case you get stuck in the dark.
Example of lack of visibility on the trail on Day 2. It was like travelling through clouds.
Warning: the distances recorded on official sites are incorrect. There have been multiple bloggers and a solo hiker we met on the trail recording very different km ranges. While hiking, it was obvious that the actual distances were much further apart. A blogger commented that it is “demotivating” when you expect to arrive at your campsite after 19km and continue confused for another 2.5km. Fair point.
Honestly, it’s dangerous because the total hike came down to about 74km, not 63km as advertised. It’s very deceiving; some hikers leave their campsite late, having an easy morning, thinking they are going to have a short day on the trail, then trying to rush in before sunset so they’re not left in the dark.
Also, shuttle buses don’t wait for hikers and based on our conversations with the van driver, it’s not uncommon for hikers to miss their bus. So be careful!
We recorded the following distances, starting from Rees:
Day 1: 21.5km (not 19km)
Day 2: 14.5km (not 10km)
Day 3: 18.5km
Day 4: 20km (not 16km)
We found the estimated walking times to be more accurate for everyone on the trail (except for Day 2, which underestimated the duration).
Note: you can check the weather forecast at Dart Hut. The ranger finds the forecast for the following 3 days and writes it on a whiteboard in the main kitchen area. The ranger also has a radio if you need to move the shuttle bus a day earlier or later. If the huts are crowded, rangers keep 1-2 extra mattresses that you could use. The ranger in Dart Hut collects all of your hut tickets (they don’t have honesty boxes).
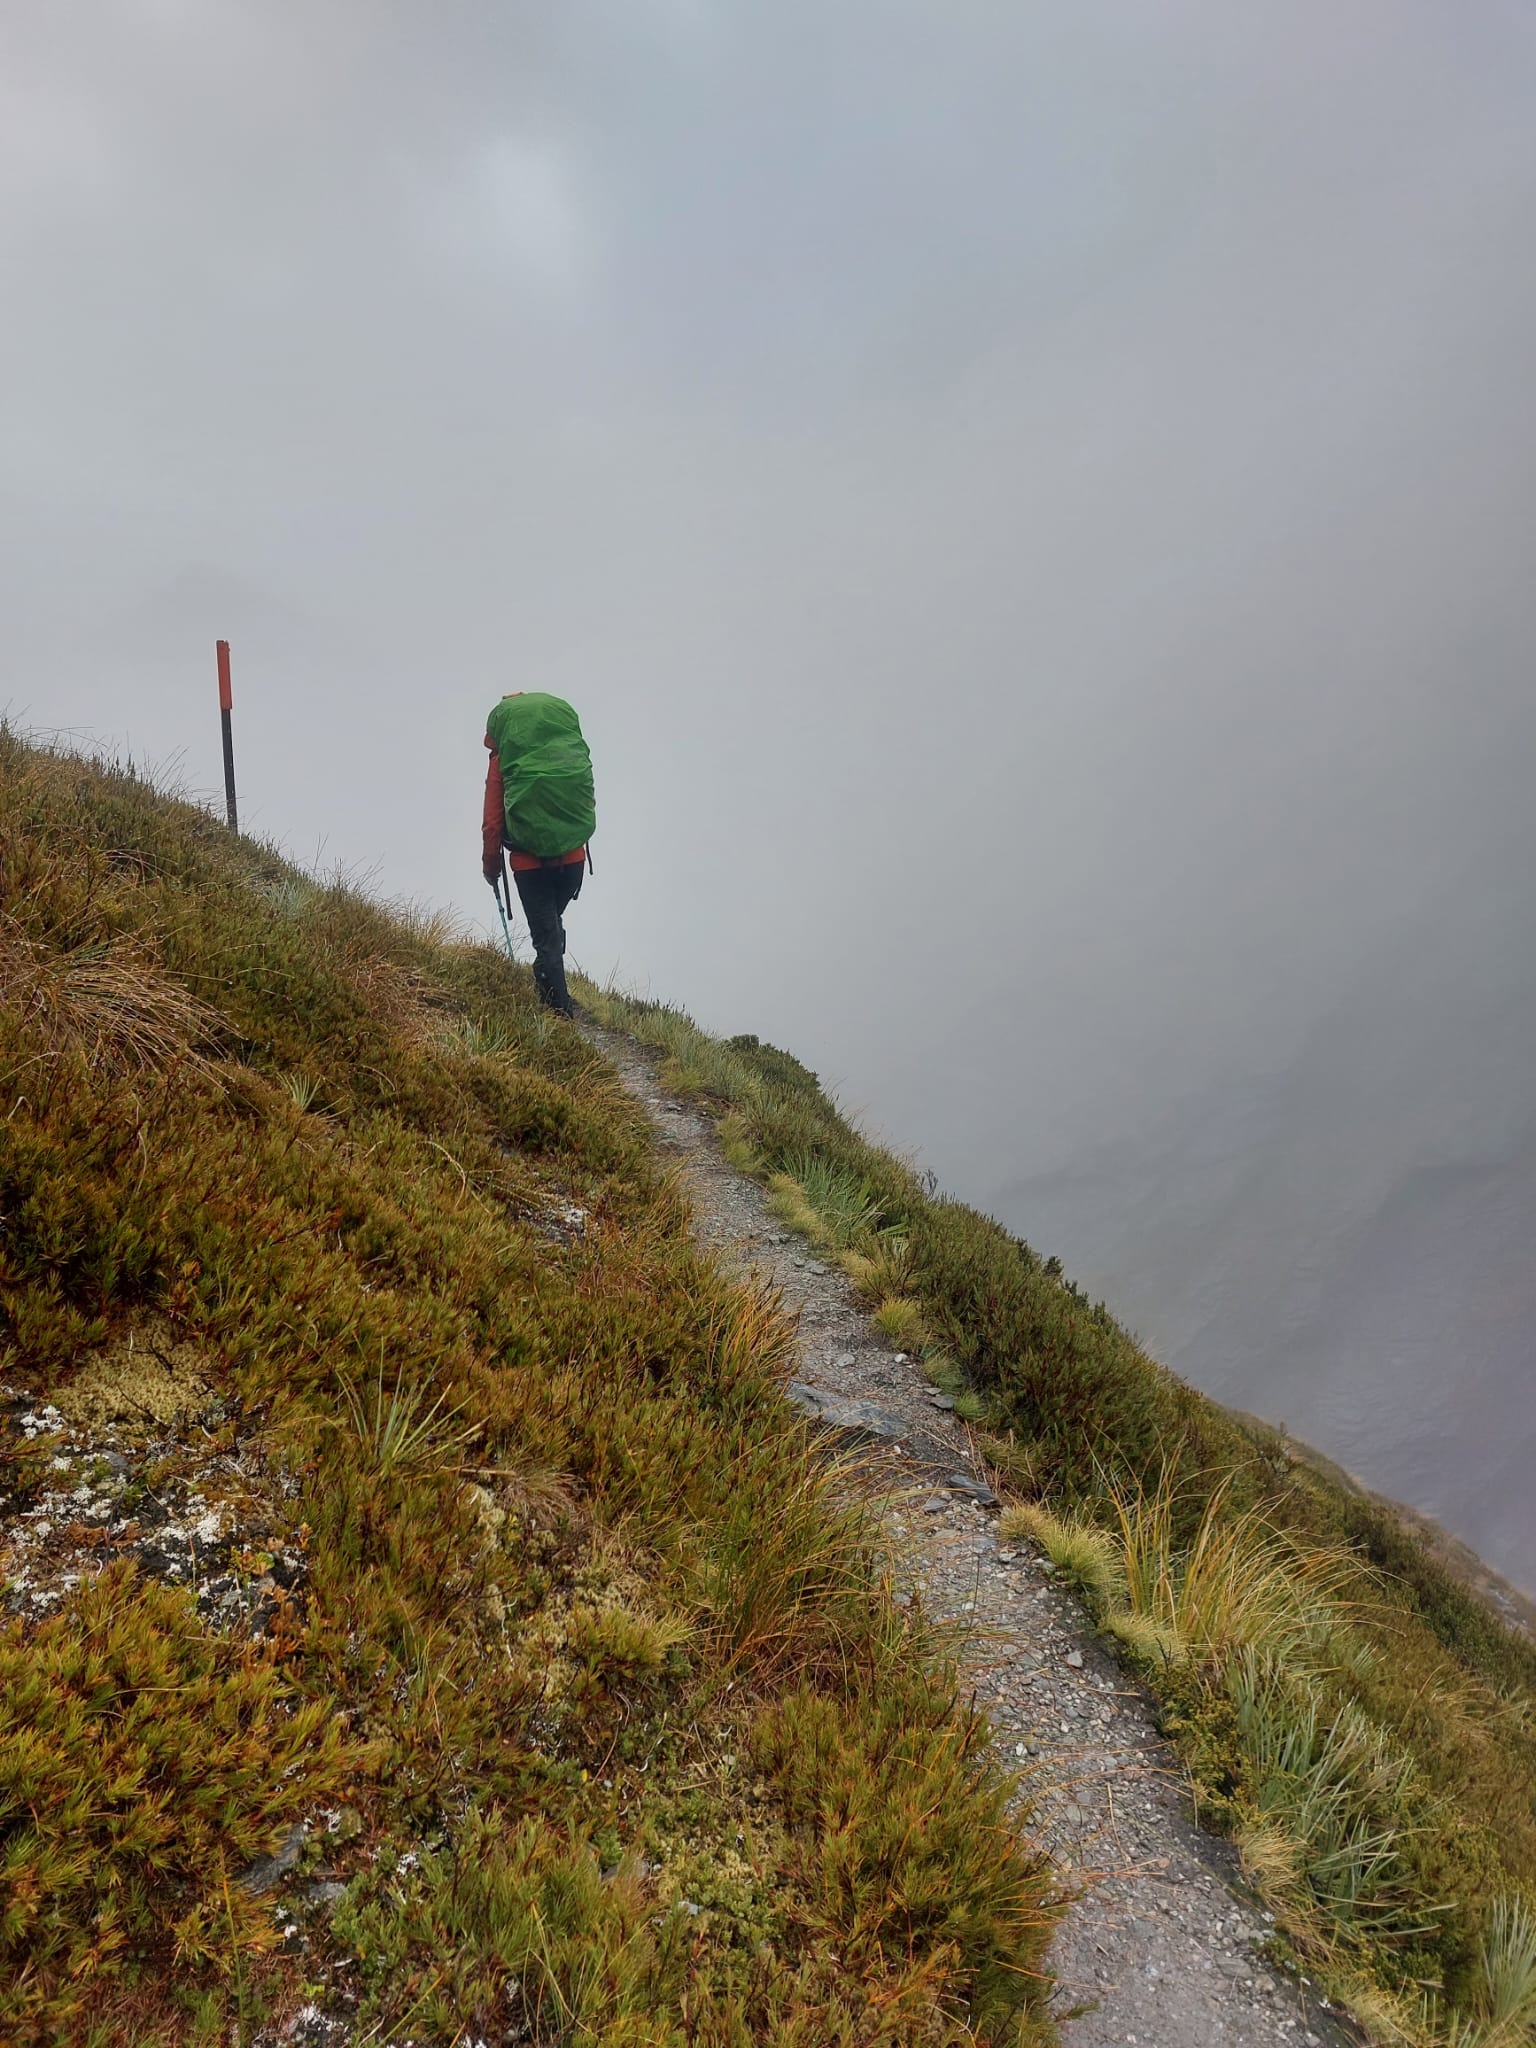
Note: walker’s huts have very good facilities. After the Tasmanian wilderness experience, this was a big surprise. They had nice toilets with toilet paper and flush, big kitchen area with cleaning tools and multiple big tables, fire pit with coal and wood, clotheslines, maps and information booklets, games, lots of hooks to hang your wet clothes and candles. The huts were relatively spacious and warm.
I recommend bringing headlamps or torches because the huts don’t have light switches. I also recommend bringing in items for your comfort because you can really get cosy and comfortable in these huts. It’s also because you save a lot of time by not setting and packing up the tent, and some weight from not carrying the tent equipment. Some nice additions to your hike can be ear plugs (people snore when they are tired), tea, coffee, hot chocolate, instant soups, a reading book (or Kindle), notebook/sudoku and pens, card games, swimmers (if you enjoy icy baths and be careful with the river currents), a bigger pillow, phone charger (ones with batteries in them) etc.
Shelter Rock Hut fits 22 bunks. Dart Hut fits 32 bunks. Daley’s Flat Hut fits 20 bunks.
Dart Hut common area.
Note: we were unsure if bringing a tent was necessary. Based on our conversations and observations, this hike is not one that gets overcrowded. There have been some cases during summer when a few hikers had to sleep on the ground in the huts. Some people recommend bringing a tent if you want to attempt the Cascade Saddle side trail because it’s a difficult and very long hike. However, to see the glaciers, you don’t have to complete the side trail (the glacier viewing point is said to be 14km).
My view is that it’s not worth carrying the weight of your tent for 4-5 days unless you really want a tenting trip (alone in the tent wilderness experience).
Note: a bunch of people recommended bringing sandals and wearing them from Rees to Shelter Hut due to the constant dampness of the trail (boggy, mushy) with flat terrain. Spot on. This part of the trail is so much more comfortable when hiked with hiking sandals, so the water drains out. We bought lightweight hiking sandals which were $140 before this trail.
Note: sand flies are a big problem, so bring insect repellent. However, they don’t like the cold and late April seems to be too cold for them to buzz around. We were safe from their attack until the last day while waiting for the shuttle bus. Now our hands are full of little red dots.
Packing Guide
Now that I experienced sleeping in a walker’s hut, next time I would also bring instant coffee, instant soups, ear plugs and Kindle.
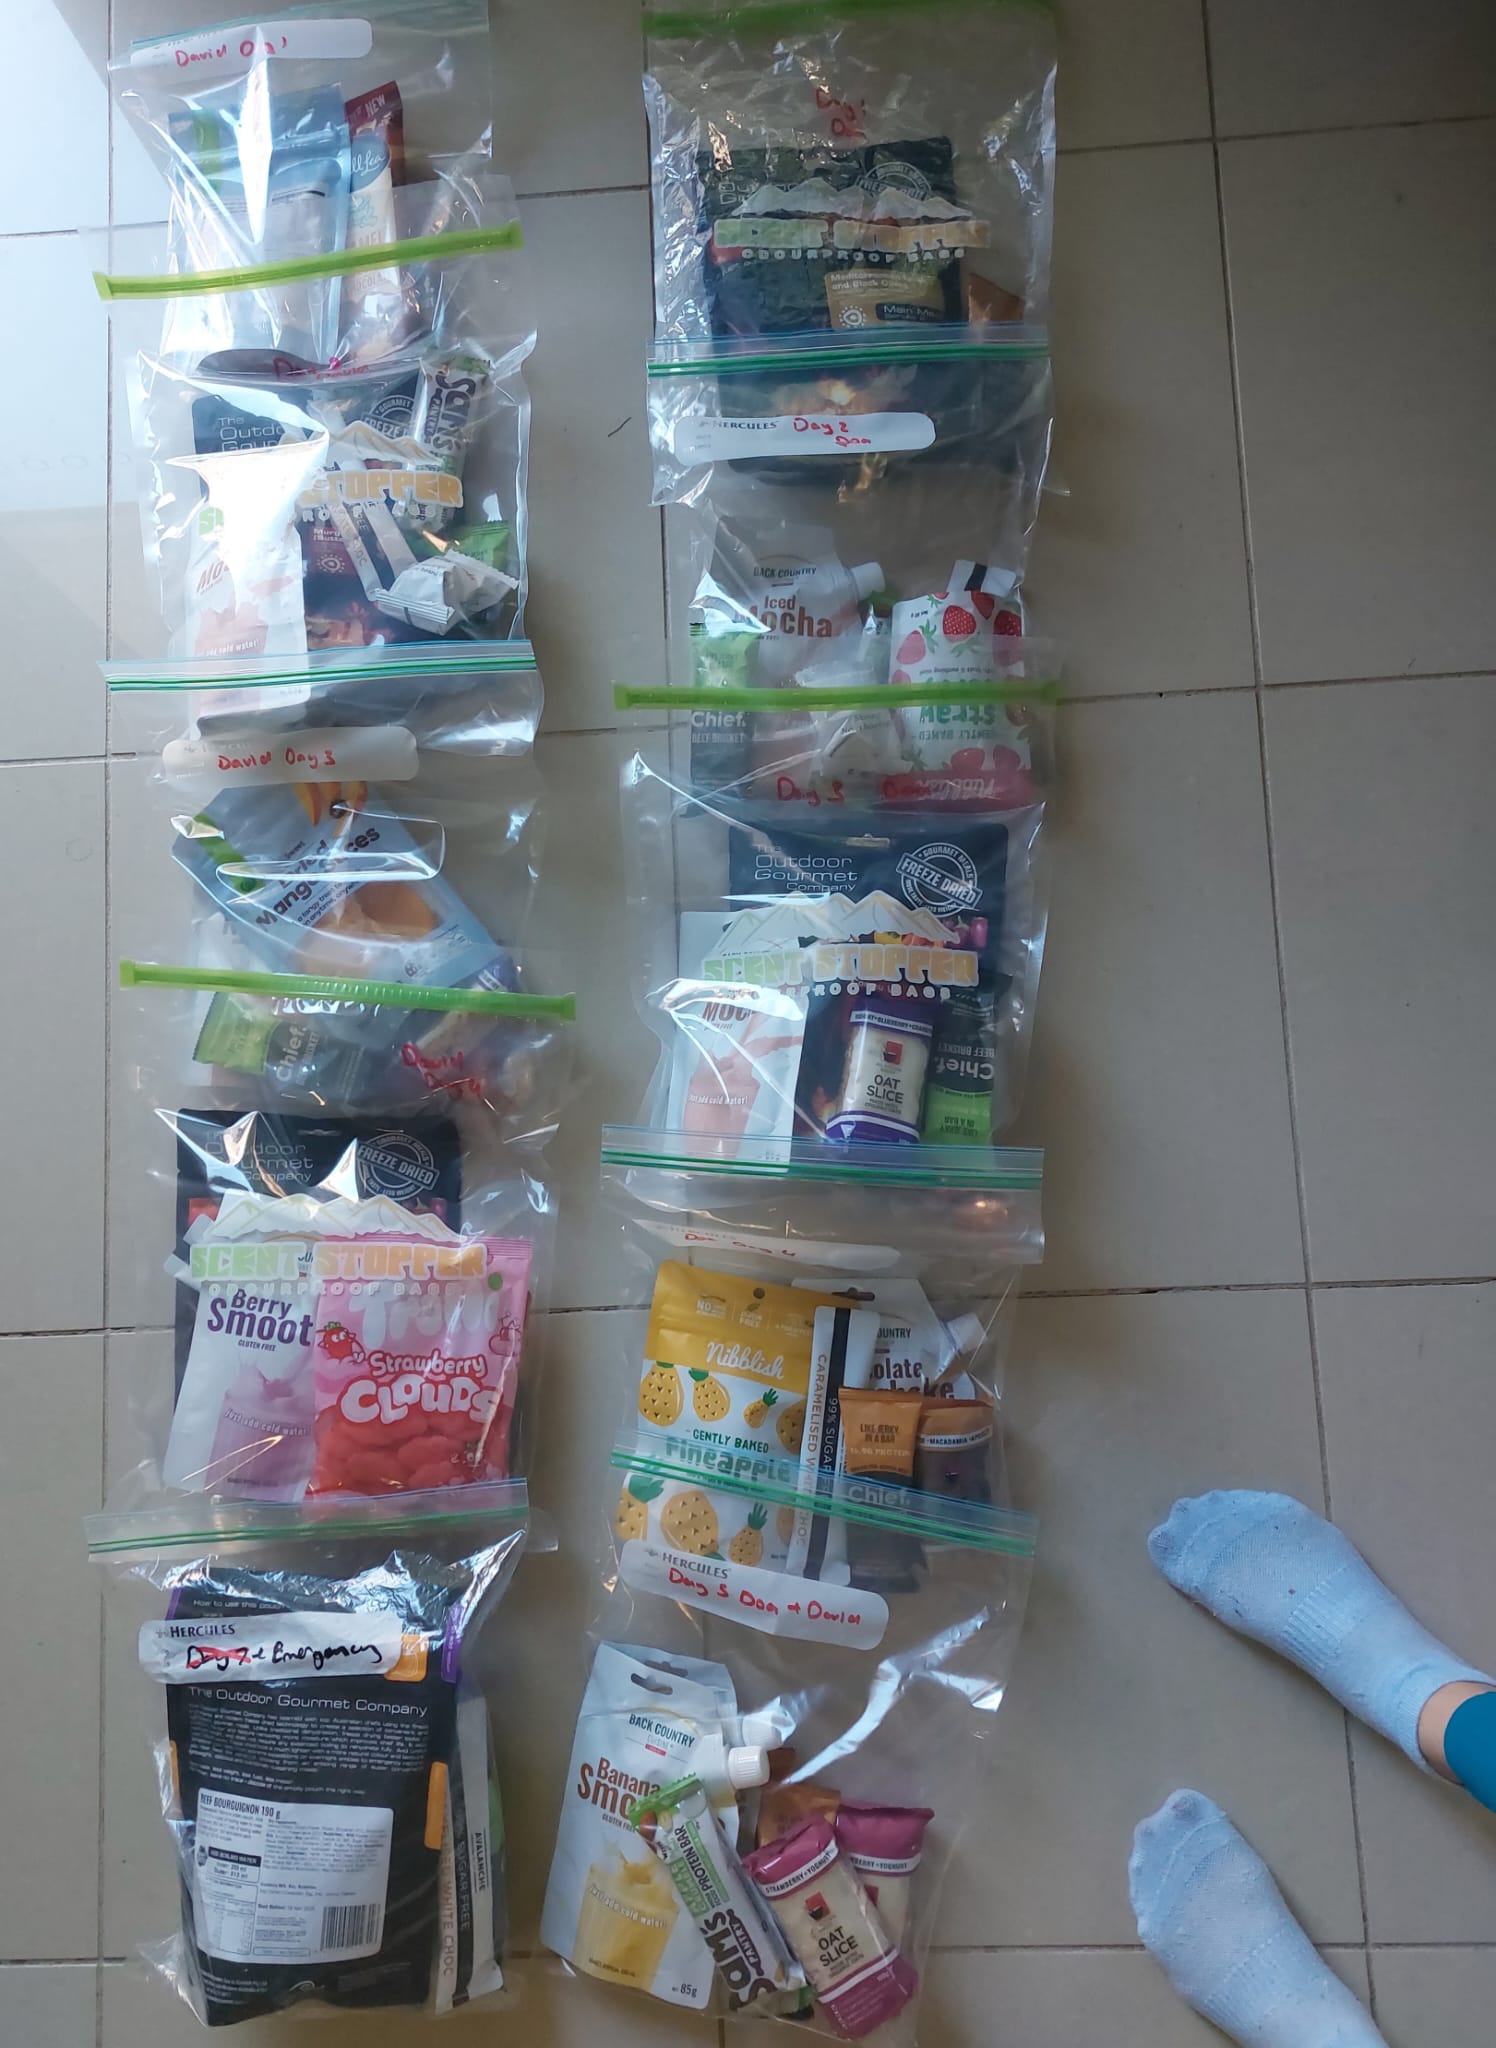
Food Guide
We intentionally overpacked the food. It was always unclear if we could attempt the Cascade Saddle side trail. So we had to pretend like our hike was 5 days long and bring an additional day of emergency food in case of adverse weather which is necessary for alpine regions (especially at the end of the season, going into winter).
I don’t think that we lost weight as the hike was only 4 days long and we had an excess amount of food supply. My general maintenance was 1760c with a running schedule (24 years old, 160cm, 50kg, 23.5% body fat) and David was at 2450c as a 35 years old about 185cm. Each day, I ate about 1960c (after calculating that I would be burning about 700c each day) and David aimed for about 2250c.
As mentioned in the SCT Tasmania post, I brought electrolyte sachets which were amazing. I also experimented with alternative foods that weighed less, had higher calories and brought variety to our meals.
Note that in cold climates, food gets very cold. It sounds like a no-brainer, but it was hard to bite into chocolate, dried fruit, lollies, and even oat/nut bars. It was harder to make the morning milkshakes as the consistency got very thick quickly after mixing in water.
Breakfast: powdered smoothie/milkshake packs from Backcountry Cuisine. They are still the best breakfast! However, if we hike in a cold climate with the convenience of a walker’s hut again, we may prefer a warm breakfast, and use these smoothies for lunch instead.
Morning Tea: this is a new concept we introduced to get enough energy. We alternated between Sam’s Pantry apple crumble protein bar (230c) and Health Lab’s cookie dough balls (220c). These were delicious! We also had a few small chocolate easter eggs.
Lunch: I had a chief meat bar, All Natural Bakery’s oat bar on 2 of the days (430c) & about half dried fruit (mango/pineapple/strawberry alternating).
David had a chief meat bar, All Natural Bakery’s oat bar OR dried freeze lunch meal alternating (450c), Musashi salted caramel protein bar on 2 of the days (400c) & about half fried fruit.
Dinner: we shared Backcountry Cuisine’s gourmet meals. These are still our favourite. However, for future trips, we may buy individual meals for higher calories so we don’t have to snack much between meal times.
Dessert: another new concept that we introduced to treat ourselves for our hard work. We shared Avalanche’s sugar-free hot white chocolate for 2 nights (55c), a small pack of cloud lollies (200c), and Darrell Lea Caramel Cheesecake Milk Chocolate (did not like the taste of this).
Emergency: 2 powdered smoothies, 2 chief meat bars, 2 Sam’s Pantry apple crumble protein bars, dried mango, Backcountry Cuisine’s gourmet meal, and 2 hot chocolate sachets.
I’ll make a separate post about the different hiking foods we’ve tried, what we liked, what we did not enjoy, weights and calories.
Training Guide
Training is highly recommended for your safety. The reality is that some Grade 5 hikes have a history of hikers who attempted but passed away, or activated their PLB for rescue. Hiking injuries are relatively common in difficult terrains. Coming to camp or a walker’s hut and seeing one person (or more) trying to strap up their ankle, knee or calf is almost ‘the norm’. I believe that training can significantly reduce your chances of injury.
Also, the fitter you are, the more enjoyable your hike becomes. Your body feels lighter and the days become less of an effort. When you train, you realise that trails don’t have to beat you up. Despite Rees-Dart being a Grade 5 hike with challenging terrain (especially on Day 2) and daily long distances to travel (i.e. 22.5km on Day 1), this has been a very enjoyable hike for us. I had fun and could have done another 2 days on the trail.
To give an example, a family of 6 was hiking with us. They had 4 kids around my age with lots of hiking experience. On the steep descends (which I felt scared to go fast on), they galloped down like mountain goats. Their confidence on the rocky terrain was so impressive that I had to stop and admire for a few seconds.
Another example is that David spent too much time volume training the upper body (even putting on 7kg of muscle in 3 months) but clearly not enough time doing leg workouts. He was exhausted, falling behind, and calling for rest breaks while going uphill. Travelling at faster paces put stress on his feet and ankles. He also felt accumulated tiredness in the mornings, rather than starting the day fresh. “I need to train the legs. Cannot keep up, you fly ahead, it’s like we switched roles.” — David’s conclusion on Day 2.
Basics (make sure you have done)…
Multiple multi-day hikes ranging between 2-4 days (ideally some with long distances every day, i.e. 24km day).
Hiking with bag weight +2/+3kg heavier than your planned weight.
A few other Grade 4 and 5 hikes before (can be day hikes).
Resistance training (lower body); I had 2 lower body days in the gym replicating hiking movements (i.e. dumbbell step-ups).
Cardiovascular training; I run 3x a week (3.5km beach run, 6km pace run, 10km distance run).
Mobility, balance & flexibility; this is about being proactive/preventative, rather than reactive after an injury (I focus on ankles, calves, feet and knees).
Terrain (make sure you have done)…
Boggy/mushy or wet/watery hiking. This is to get comfortable with slippery surfaces and hiking with muddy and soggy feet for 20km.
Steep ascends and descends.
Climate (make sure you have done)…
Alpine hiking; to get used to sudden weather changes, heavy rain, heavy wind and the cold; this is important for hikers coming from hot regions and climates.
Please note that we got serious about hiking at the start of 2023. Prior to that, I've never stepped inside a gym or ran before, played any team sports, or even got on monkey bars while growing up. Very unfit and uncoordinated background/history.
If you had and have an active lifestyle, you may view my guide as ‘over the top’. I cannot underestimate how much growing up playing outdoors can help someone with their confidence and endurance on a variety of terrains.
Questions: if you have any questions about my notes, leave a comment and I’ll reply.
Thanks for reading! Subscribe for free to receive new posts and support my work.